
TL;DR: I wanted to buy a mouse which was on 50% sale twice a year. I was too lazy to check when it's on sale, so I created a website that will do that for me and send me an email when there is a change on the price/availability using Azure serverless architecture and .net core framework. If you follow along, I'll teach you how to do that yourself or you can use my website.
- Serverless buzz word
- Idea
- Azure functions
- Azure queues
- Azure tables
- Email sending
- ASP.NET Identity Core
- Azure resources
- Product scraper solution
- Code and test Azure Functions locally
- Azure Storage Explorer
- Running the solution
- Contact info
- Code GitHub repo
Serverless buzz word
To be clear, serverless != no server, there is no such thing as web architecture where no server is involved. In my opinion serverless is a poorly chosen word for architecture that doesn't require a whole server to be dedicated to doing a job of serving a small amount of processing, retrieving or writing data. Instead, there is one Mega-Giga-Tera big server (usually some cloud provider such as Amazon, Azure, Google services or similar) that can be used as a place where we can deploy a very small/tiny methods (stub routines) that can deal with this tiny data processing requests.
Idea
In this demo project, I'll try to cover a few areas of the Azure serverless architecture ecosystem and use them on a real application. My idea was to create a web page where I can create a list of products/items that are available on online shops and track their changes, and whenever there is a change on the price or availability an email with the updates will be sent to me. That way I'll save myself some time checking product prices to see when they are on sale or become available. To get details from some URL, we going to use a scraper to collect data from other websites. Every website/webstore has a different layout and for that, we need to configure our scraper to be able to scrape different stores.
Azure functions
As I said earlier, I used Azure functions to establish the server-side functionality. An azure function can be triggered/called in several ways, in this demo I'll be using Http, Queue and Timer triggered functions. For more details, you can check the full documentation on this link.
Azure queues
In my example, I'll be using queues as a channel for communication between my functions. For example, when the function for detecting product change has detected some change, it sends a message to the email-queue and then, another function (queue triggered) for email sending is listening to that same queue, and whenever there is a new message it picks it up and sends the email accordingly. So, no direct call between the functions (methods), they communicate using the queues. That allows us to have an asynchronous workflow.
This is the official Microsoft definition for the queues:
Azure Queue Storage is a service for storing large numbers of messages. You access messages from anywhere in the world via authenticated calls using HTTP or HTTPS. A queue message can be up to 64 KB in size. A queue may contain millions of messages, up to the total capacity limit of a storage account. Queues are commonly used to create a backlog of work to process asynchronously.
For more info about the queues, you can check this link.
Azure tables
In most of the cases when you create a web application there is a need to store some data. Usually, we store it in tables or files. Depending on the nature of the application or our skills we can choose between SQL or NoSQL storage. In most of my projects, I've been using MSSQL and PostgreSQL, but in this demo, I will use Azure Table storage.
This is Azure definition of Table storage:
Azure Table storage stores large amounts of structured data. The service is a NoSQL datastore which accepts authenticated calls from inside and outside the Azure cloud. Azure tables are ideal for storing structured, non-relational data.
For more details, you can check the full documentation on this link.
Accessing table data
To store or retrieve data from tables, you need to have a way to access them. In my demo application I'm be using two different approaches to access the table data:
Direct access
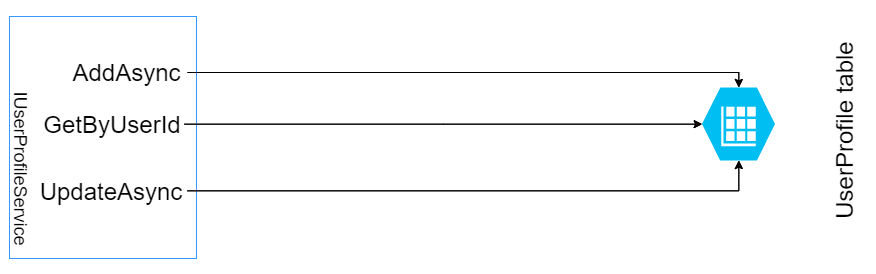
You can use the Microsoft Azure Storage Libraries for .NET and have direct access to the storage tables. I used this in IUserProfileService for the CRUD operations. This way cheaper because you will access the data directly, bypassing azure functions.
Access using azure functions
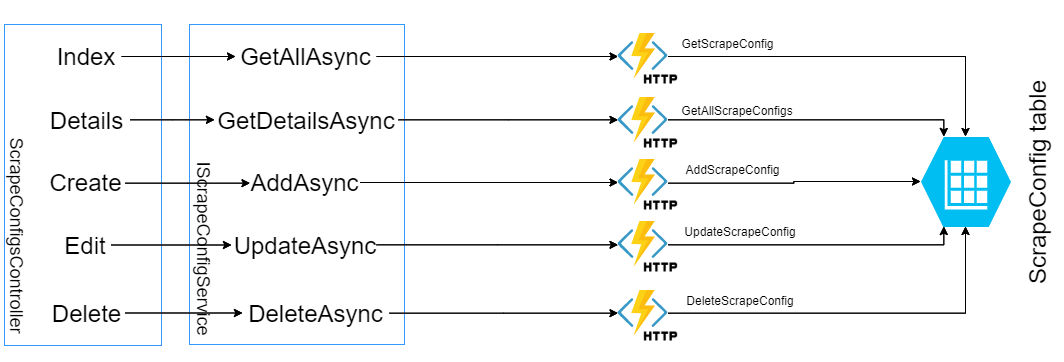
Another way to access your data is to create an Azure Function that will do that, so instead of writing directly to the table, you will pass data to the Azure function and then the function will store the data in the table. This maybe sounds like overkill, having a 'redundant' layer (function) in the middle, because you need to maintain the function and pay for the usage of the function, but it also has its benefits. You can bind to different queues and notify them; you can easily log everything in one place and many other benefits. I use this approach in IScrapeConfigService implementation.
Email sending
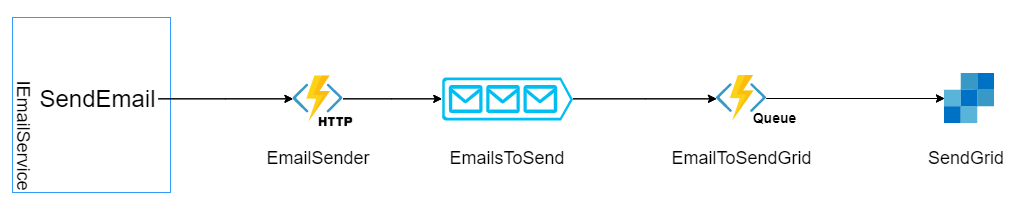
To send emails, I used SendGrid service integrated into Azure. It's really easy to set up an account and then using Azure Function you can easily send an email. You can bind an Azure function to queue and whenever you send message to that queue SendGrid will send an email. Easy Peasy.
In my demo, I've created a service that I will use to send emails whenever my app needs to send any. So, I created a Function that will accept email messages, and then it will populate all the required data if needed and send them to message queue. From that message queue, a function that is triggered on message queue will pick it and forward it to SendGrid.
ASP.NET Identity Core
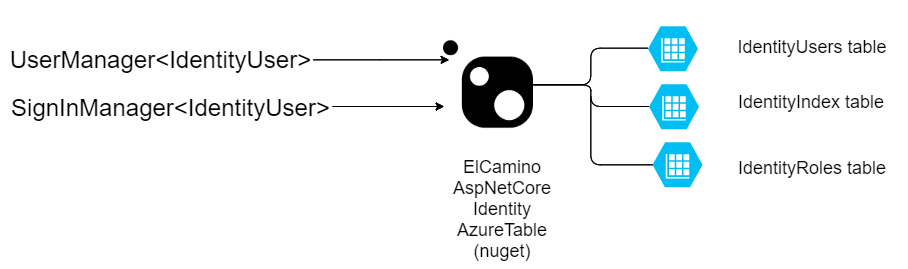
Whenever users are involved in a web application, there is always a need to be able to authenticate or authorize them. Usually, when we use .net core as a technology we tend to use Identity service. One thing that is bonded to the Identity service is that it requires MSSQL data provider, but that is now what is suitable for me in this demo since I choose to use Azure tables as storage, of course, we can make a hybrid app where identity will be stored in MSSQL and all other data in Azure tables, but I found a NuGet package that will implement all the Identity functionality but it will rely on Azure Tables, that's great. This is the package Identityazuretable that I'll be using in this project for the identity part.
Azure resources
I've mentioned a few Azure services. To be able to reproduce this solution you will need to use several Azure resources.
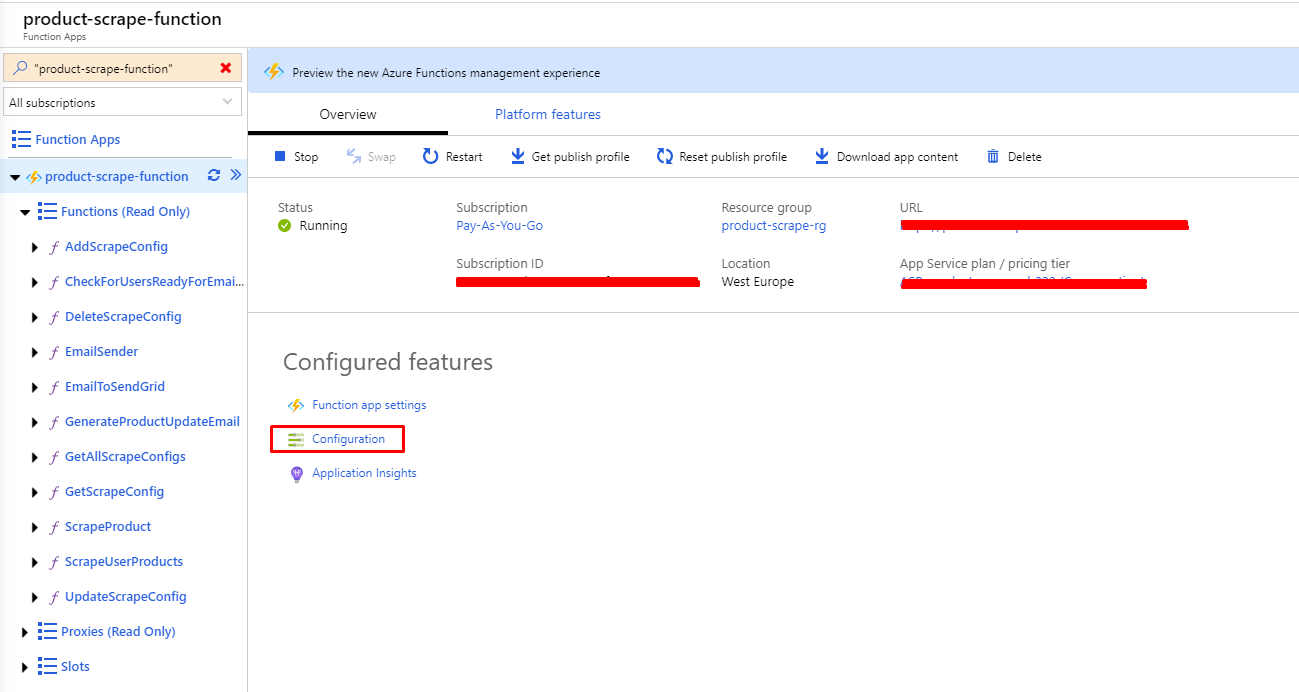
Azure function
For the Azure functions, you'll need to create a Function App. In the process of creating the Function App, in the Hosting step, you will be asked to create a Storage Account if you don't have one created previously, just type the name and the wizard will create it for you. You can see mine in the screenshots below. Once created you can check your Storage account here. You need this Storage Account for the Tables and Queues that we will be using in this tutorial. For the PlanType, also on the Hosting tab, I've selected Consumption(serverless) because that was the cheapest one that will serve the needs of this application. Please be aware always before creating an Azure resource to check it's pricing because it maybe will be too expensive or will not be compatible with the needs of your product/application.


Send grid
Also, I mentioned SendGrid, to be able to send emails using the Azure functions, you will need a SendGrid account, you can create one via Azure resources or create one directly on their website. Once you have created the SendGrid account, you need to obtain an ApiKey that will associate the FunctionApp with your SendGrid account (if you have any questions on this please let me know). Once you have the SendGridApiKey you will need to add to the Azure Functions Configuration settings (check the screenshots).

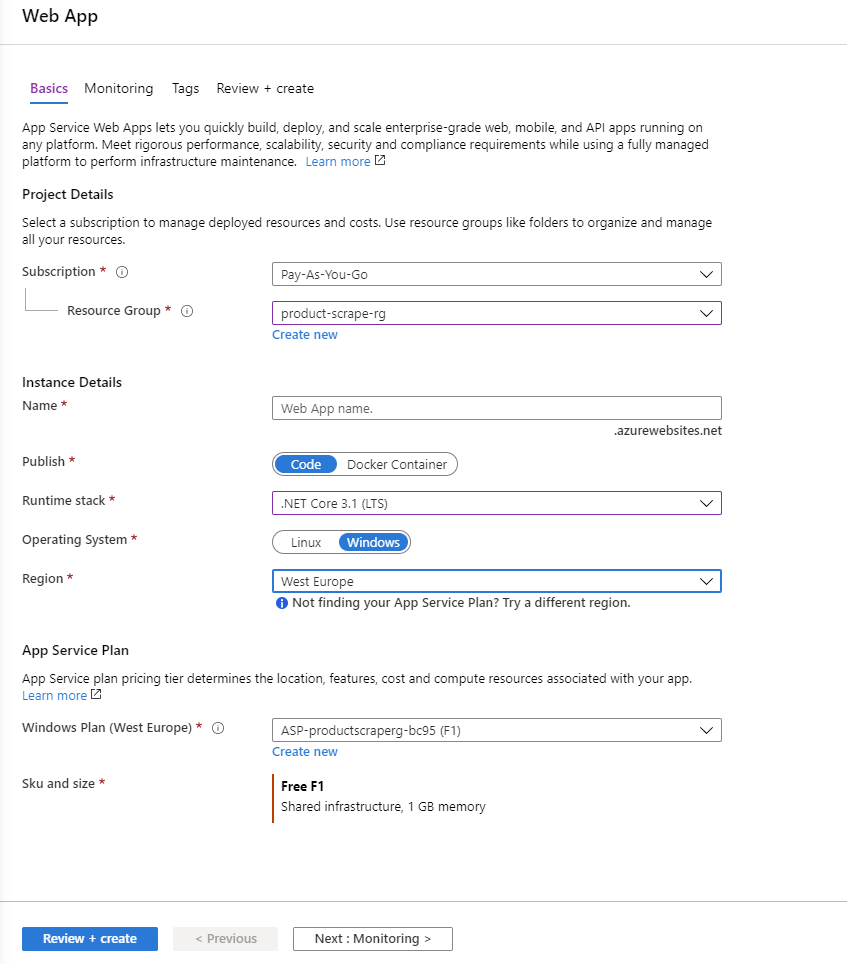
App service
In the end, you will need an App Service or a place where you can host your website that will interact with the Azure Functions. Of course, you can host your web application anywhere and still communicate with the Azure Functions, but in this example a tired to stick with Azure services, so I've created AppService and hosted my .net core application here. Creating an App service is pretty straight forward wizard, be careful with the pricing tiers (App service plan), I've chosen the free option, but of course, there are lot more other plans that you can use to scale your application.
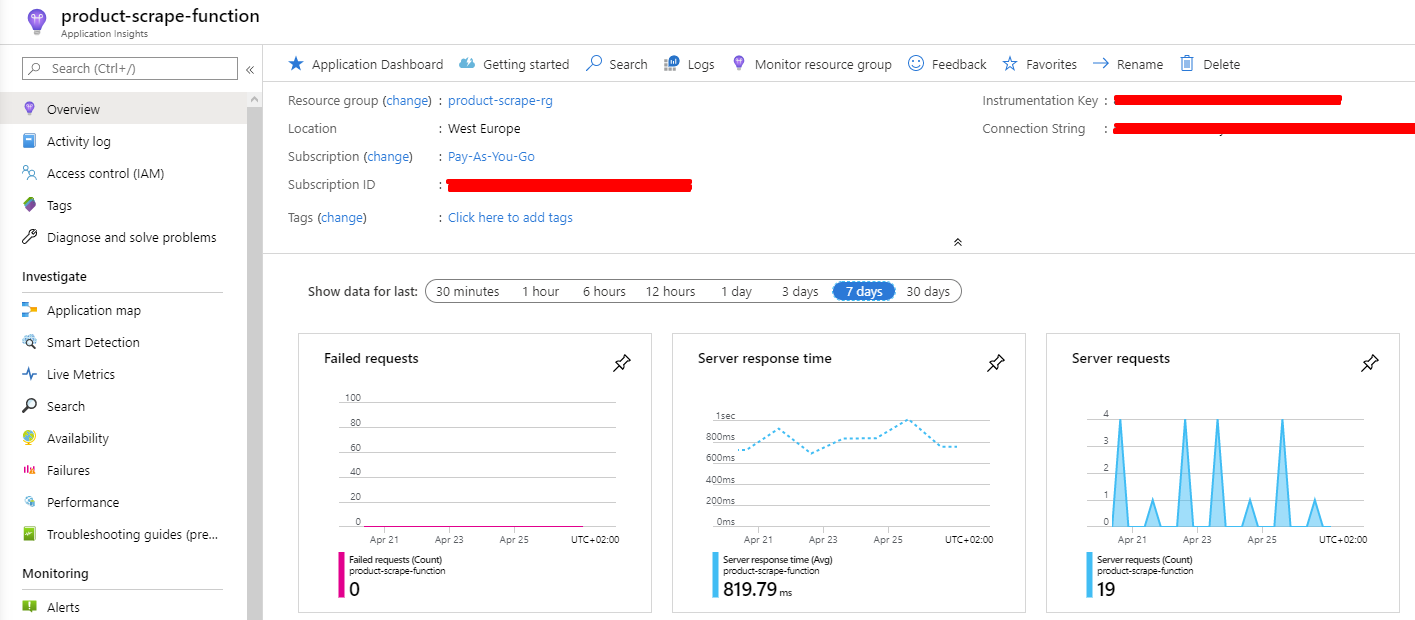
Application Insights
Application Insights it's a nice way to track the health of your Function App or App Service, here you can see a lot of useful info related to the Availability, errors, Failed Request, Server response time, Server Request and many many more things. I've created two Application Insights services, one for the Azure Function and one for the App service.
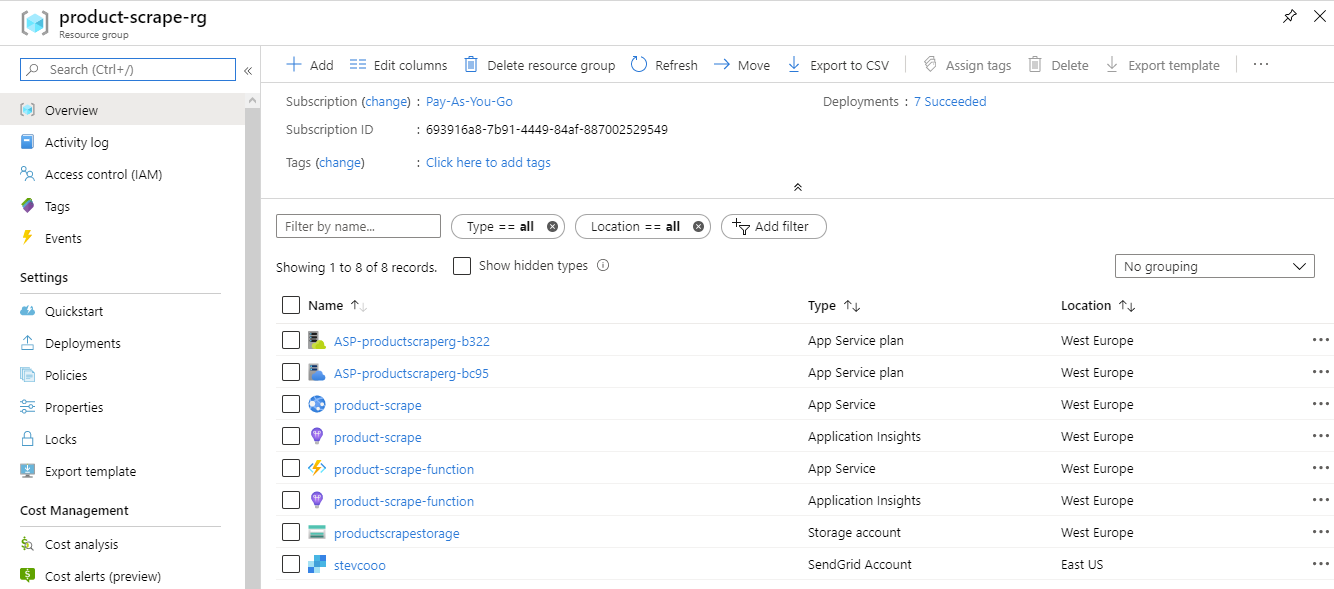
Resource group
An Azure resource group is like a namespace or folder or a group for Azure services, whenever you create a service there is a filed where you can choose on which resource group that service should belong. This is a nice thing to be able to group all your services that are related to the same project. This is extremely useful when you have several Applications ecosystems, you can easily track them and see all services that are related. For this demo, I've used the same resource group for all services, and now I can easily see all the services that I'm using for this ProductScraper project.
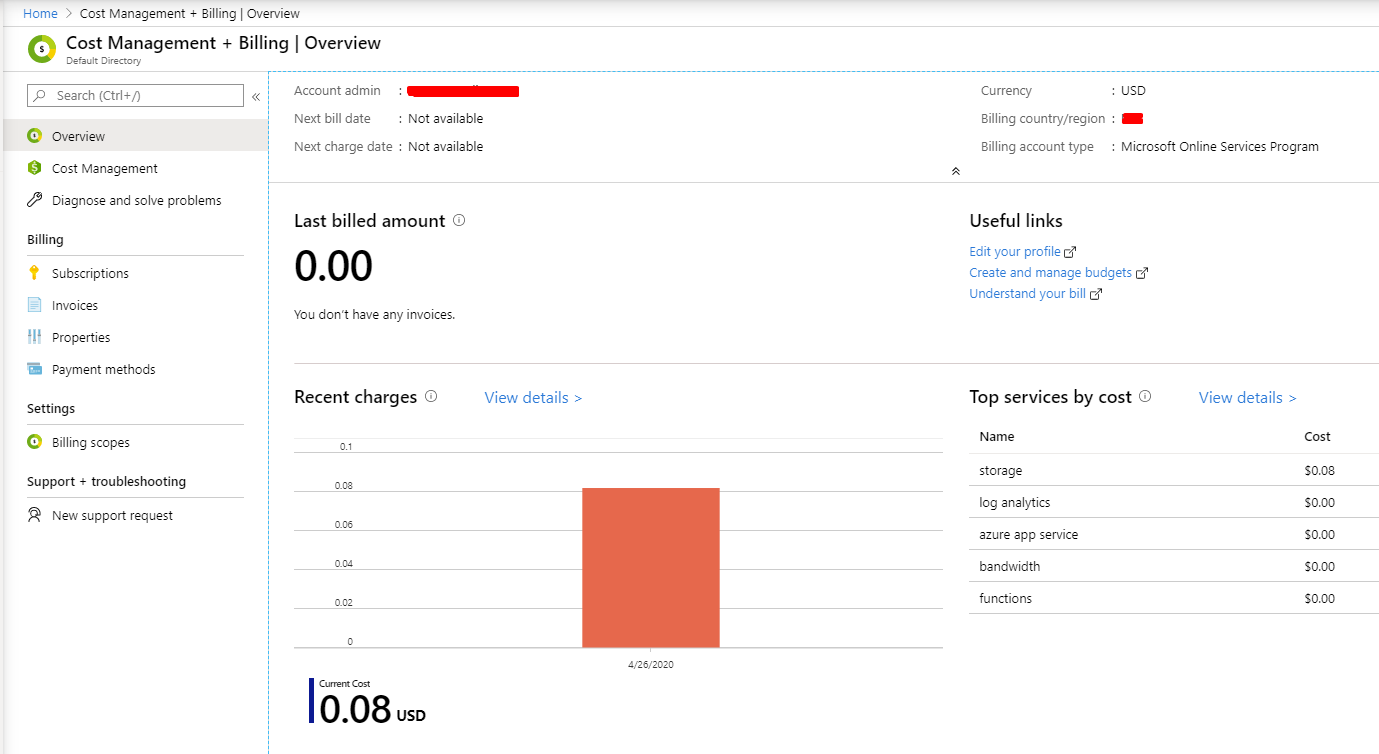
Cost Management and Billing
The very important thing is when using online service where you have a play Pay-as-you-go, like in this case, to check your bill every few days to avoid big or unexpected costs. I've done this mistake once, I've ended up with a huge bill because I selected some pricing plan that I wasn't aware how much it will cost (Always check Azure pricing, always! ). In this section you can check how much you have spent so far (if any) and witch service costs you how much.
Product scraper solution
As I mentioned in the first sentence my idea was to build a product scraper that will collect products info and send me an email whenever there is a change in them. In the following context, I'll try to explain the most important things in the application, if something is unclear or there is no enough info provided please let me know. You can see in the repository that my solution is divided into 5 projects. I'll try to explain their purpose and the most important code in them.
ProductScraper web
This is a web project. Here I configure the Identity settings to use ElCamino.AspNetCore.Identity.AzureTable NuGet package for user registration/authentication/authorization.
You can see this configuration in Startup.cs file in ConfigureServices method.
    public void ConfigureServices(IServiceCollection services)
    {
        services.AddDefaultIdentity<IdentityUser>(options =>
        {
            options.SignIn.RequireConfirmedAccount = false;
            options.User.RequireUniqueEmail = true;
            options.Password.RequireDigit = false;
            options.Password.RequireLowercase = false;
            options.Password.RequireUppercase = false;
            options.Password.RequireNonAlphanumeric = false;
        })
        //ElCamino configuration
        .AddAzureTableStores<ApplicationDbContext>(new Func<IdentityConfiguration>(() =>
        {
            IdentityConfiguration idconfig = new IdentityConfiguration
            {
                TablePrefix = Configuration.GetSection("AzureTable:IdentityConfiguration:TablePrefix").Value,
                StorageConnectionString = Configuration.GetSection("AzureTable:StorageConnectionString").Value,
                LocationMode = Configuration.GetSection("AzureTable:IdentityConfiguration:LocationMode").Value,
                IndexTableName = TableName.IdentityIndex, // default: AspNetIndex
                RoleTableName = TableName.IdentityRoles,   // default: AspNetRoles
                UserTableName = TableName.IdentityUsers   // default: AspNetUsers
            };
            return idconfig;
        }))
        .AddDefaultTokenProviders()
        .AddDefaultUI()
        .CreateAzureTablesIfNotExists<ApplicationDbContext>(); //can remove after first run;

        ...
        ...
    }
For more detailed info on how to set this configuration, you can check on the official project site.
Also in Startup.cs file in ConfigureServices method, there is configuration about the Azure table that I'm using. Here I add settings for each Azure table such as ConnectionString and TableName.
ProductInfo table config
    services.AddScoped<IAzureTableStorage<ProductInfo>>(factory =>
        {
            return new AzureTableStorage<ProductInfo>(
                new AzureTableSettings(
                    storageConnectionString: Configuration.GetSection("AzureTable:StorageConnectionString").Value,
                    tableName: TableName.ProductInfo));
        });
ScrapeConfig table config
    services.AddScoped<IAzureTableStorage<ScrapeConfig>>(factory =>
        {
            return new AzureTableStorage<ScrapeConfig>(
                new AzureTableSettings(
                    storageConnectionString: Configuration.GetSection("AzureTable:StorageConnectionString").Value,
                    tableName: TableName.ScrapeConfig));
        });
UserProfile table config
    services.AddScoped<IAzureTableStorage<UserProfile>>(factory =>
        {
            return new AzureTableStorage<UserProfile>(
                new AzureTableSettings(
                    storageConnectionString: Configuration.GetSection("AzureTable:StorageConnectionString").Value,
                    tableName: TableName.UserProfile));
        });
Also, in this project, in the Identity section, when a new user is registered, I'm creating a record in UserPfofile table, in this table, we will keep all the additional info related to the users. You can see this in the
Register.cshtml.cs file in OnPostAsync method. Here is the code segment that is adding a record to the UserProfile table. You can note that Id value of IdentityUsers table record is used as Userid in UserProfile table, that's the link between these two tables.
UserProfile userProfile = new UserProfile
    {
        UserId = user.Id,
        EnableEmailNotifications = true,
        DaysBetweenEmailNotifications = 7
    };
    await _userProfileService.AddAsync(userProfile);
Also, there is a need some user(s) to be an administrator on this application to be able to create/edit/delete ScrapeConfigurations, so in that manner, were in this same method when a user is created I'm checking if that's the first user that creates a profile, if so, then I assign Admin claim to him.
    if (await _userProfileService.GetUsersCount() == 1)
    {
        Claim claim = new Claim(ClaimTypes.Role, ClaimValues.Admin, ClaimValueTypes.String);
        await _userManager.AddClaimAsync(user, claim);
    }
To be able to authorize with Claims you need to add Authorization policy in Startup.cs file in ConfigureServices method
    services.AddAuthorization(options =>
    {
        options.AddPolicy(Policy.AdminOnly, policy => policy.RequireClaim(ClaimTypes.Role, ClaimValues.Admin));
    });
After you configure the policy for Admins, you can add [Authorize(Policy = Policy.AdminOnly)] before the declaration of any controller or method in order to enforce this policy. I used this in ScrapeConfigsController.cs.
Or if you want to use this inside a method, you can use User.IsInRole(ProductScraper.Common.Naming.ClaimValues.Admin)
Also, in this project I've created two controllers, ProductsController.cs and ScrapeConfigsController.cs, they using the Services created in ProductScraper.Services project are interacting with the data, reading and writing to Azure tables or calling Azure functions.
ProductScraper.Common
This is a small netstandard2.0 project. Here I'll store all the common things for all other projects. For example, to avoid using strings and magic numbers in the code, I place all of them here and then use them as a constant field. That way when I change the name of a function, or a queue, I don't need to check all code, I only change the name here in this project. When you're using functions and queues, it's easy to forget the change a queue name in all functions that are related to that queue, but this approach helps you to avoid that scenario. This is how I keep track of the table names:
This is how I keep track of the table names:
    public static class TableName
    {
        public const string ProductInfo = "ProductInfo";
        public const string ScrapeConfig = "ScrapeConfig";
        public const string UserProfile = "UserProfile";

        public const string IdentityIndex = "IdentityIndex";
        public const string IdentityRoles = "IdentityRoles";
        public const string IdentityUsers = "IdentityUsers";
    }
And this is how I use them later:
    [FunctionName(FunctionName.ScrapeProduct)]
    public static async Task<IActionResult> Run(
        [HttpTrigger(AuthorizationLevel.Function, "get", Route = FunctionName.ScrapeProduct + "/{userId}/{productId}")] HttpRequest req,
        [Table(TableName.ProductInfo, "{userId}")] CloudTable productInfoTable,
        [Table(TableName.ScrapeConfig)] CloudTable scrapeConfigTable,
        [Queue(QueueName.EmailsToSend)] IAsyncCollector<SendGridMessage> emailMessageQueue,
        string userId,
        string productId,
        ILogger log)
    {
        ...
    }
ProductScraper.Functions
This is the project where Azure functions are developed. I've developed three types of Azure functions, Htpp, Queue and Timer triggered.
Http triggered functions:
ScrapeProduct.csGetAllScrapeConfigs.csGetScrapeConfig.csAddScrapeConfig.csUpdateScrapeConfig.csDeleteScrapeConfig.csEmailSender.cs
Queue triggered functions:
Timer triggered functions:
Scraping
The initial idea of this project was web scraping. Whole scraping logic is located in this project in Scrape method in Utils.cs class.
I'm using HtmlAgilityPack here to do all the web scraping. It's a really nice package with tons of features and handles the web scraping very well in my experience. In order to scrape info from the web site, we need to configure which info is important for us, in this case, Name, Price and Availability.
Because every website has its own layout, we will create Config for each domain that we want to scrape info from. I've created a video where I show how to add configuration for a website.


Automatic scraping
Every time user adds a new product in his list of products, the scraping method is run in the background to collect all the data about that link. If currently there is no configuration for that website an email will be sent to the administrator to create a configuration for that website.
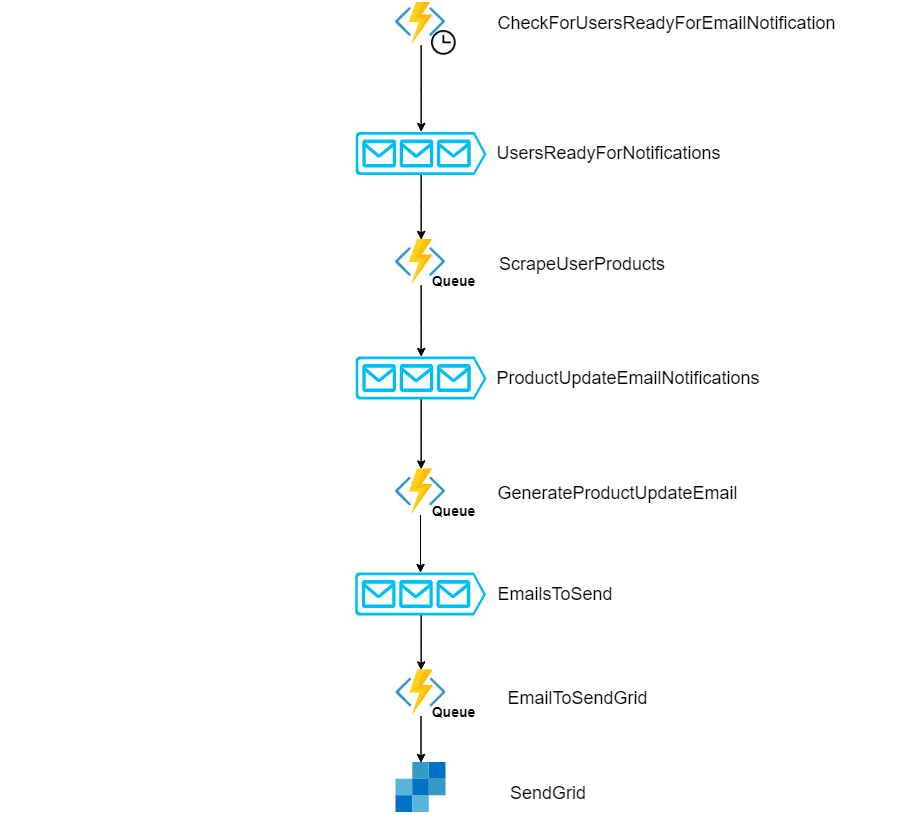
Also, here we use the Time triggered function, which occurs on constant intervals and checks for each user if scraping should be performed based on his schedule preferences, should it be every day, every month or other. If so, then for each of his products we run the Scrape method to check if there is any change in the product details from the previous time.
You can see the flow in this chart:
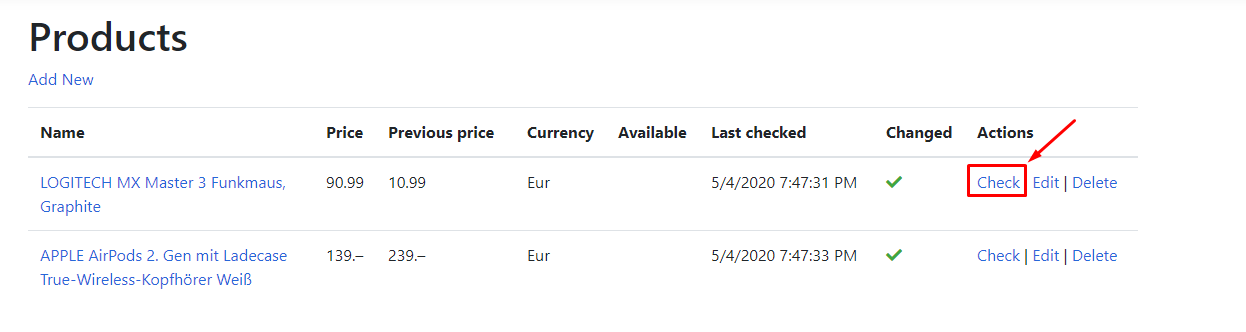
Manual scraping
User can also manually check for product changes when he opens the webpage, and in the list of the product, there is a Check button, which invokes the Scrape function.
ProductScraper.Functions.Tests
This is projected where I put all the tests. There are not many tests, I need to update it. Basically, what is use this project, for now, is for manual testing my methods and configurations. Using tests, you can easily check if some part of your code behaves like it should or not. Here I created a few ScrapConfig configurations and I can easily check if they work or not. If I set this project as a step of continuous integration, I can be sure that every configuration works without any problems, that saves a lot of pain and time.
ProductScraper.Models
Here I store all EntityModels, objects that should be saved into the database, and all the ViewModels, objects that are used for data transfer between layers, but it's not stored anywhere. One important thing about the entity models is that they are all descendants of the TableEntity class, that is required to be able to be saved in AzureStorage tables.
ProductScraper.Services
In these projects are all services that Web project is using to access the data. Every service has it's own Interface and Implementation they can be found in Interfaces and Implementations folders accordingly. As I mentioned above, here implemented two approaches of the accessing azure storage data, one using Functions and the other one using direct access to Azure Table storages.
Access data using Azure functions
In ScrapeConfigService.cs you can see how I call Azure function in order to read/write data to Azure storage table.
Direct data access
In ProductInfoService.cs you can see how i directly access Azure table using AzureTableStorage.cs implementation of repository pattern. Here in this service, I pass AzureTableSettings where all the table info is stored, in that way I can access Azure Storage Table.
Code and test Azure Functions locally
If you prefer to skip creating Azure account, you can for sure test azure functions locally, just like you test your Web applications locally before you publish them. To be able to run Azure function locally please follow this link their detailed info is provided by Microsoft.
Code and test Azure Functions locally
Azure Storage Explorer
Is a very good tool which allows you to see what's inside your storage account, which tables are created, witch queues are there and messages that are enqueued. It also offers you to review your local storage account. For more info, please check the link below.
Azure Storage Explorer
Running the solution
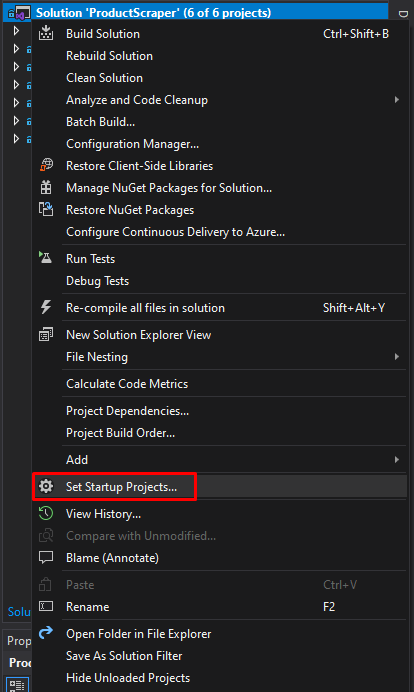
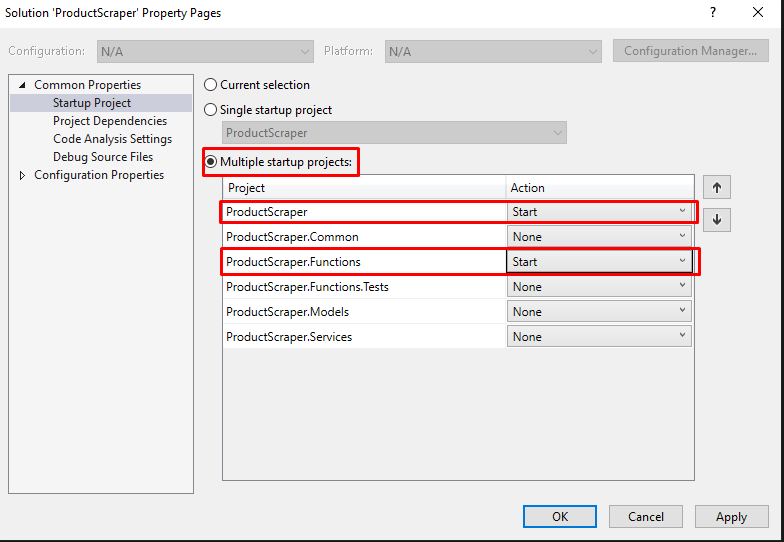
When you clone this repository, you should be able to open the solution using VisualStudio. You can check the web project by setting ProductScraper as a startup project, or you can test the functions using Postman or other API testing tool, by setting ProductScraper.Functions project as a startup project.
There is also an option to run them both and to be able to test the whole workflow. To do so, you need to do a right-click on the solution and choose Set Startup Projects... and then, on the screen that appears, choose Multiple startup projects and then in the list, choose to Start as an option for ProductScraper and ProductScraper.Functions,. Now when you click Oon start or F5, both projects will start and you can test the solution. and ProductScraper.Functions,. Now when you click Oon start or F5, both projects will start and you can test the solution.
Contact info
If you have any troubles or questions with the content of this blog, please feel free to contact me via email stevan[at]kostoski.com
Code GitHub repo
Here is the GitHub repository https://github.com/stevcooo/ProductScraper