TL;DR: I’ve built a robot that solves the Rubik's cube without any previous knowledge or experience with electronics or Raspberry Pi, Arduino, Python in less than a year as a pet project.
How it all started
It all started when I bought a Rubik’s cube just for fun. I had several of them when I was a kid, but I could never solve any of them. I even remember that I had some papers explaining how to solve it, but I didn’t understand any of it at the time. So, when I got my cube, one year ago, I put my mind to solve it and was only able to solve one side and maybe set the matching corners, but that was it, I couldn’t solve the next phase (the second layer). Then I found a tutorial on the internet “The beginner’s method”. It was a step by step tutorial how to solve any Rubik’s cube. In the beginning, it was a little bit frustrating, until I learned the notations and was able to understand the steps. Next phase was learning the order of the steps and their algorithms, and finally, I was able to solve my cube. This was my mental exercise for several days, maybe a week. After I mastered the “The beginner’s method”, I was able to solve the cube in ~2.5 minutes. After that the fun is gone, you know that you can solve the cube, and it’s not interesting anymore unless you need to kill some time.

Algorithm challenge — represent the cube in code
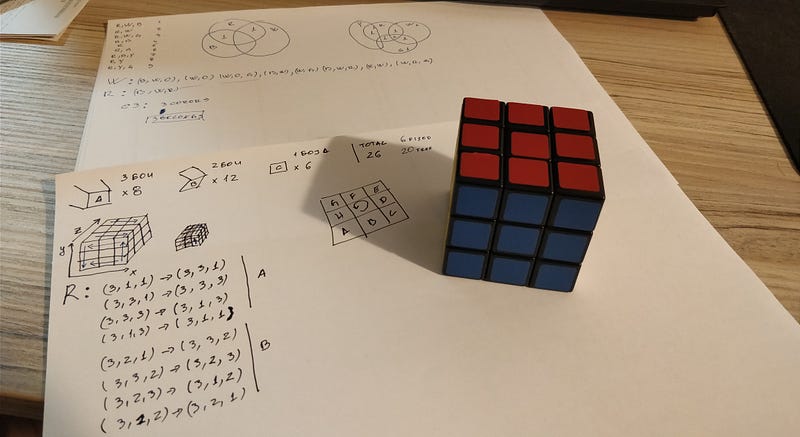
Next phase was to make a program that can solve the Rubik’s cube, not that weren’t any of them developed before, but I thought that it will be a nice exercise for me. Since the “Beginners method” is a simple algorithm that should be applied to the cube in a given order, it should be easy to develop a program that will do that for me. The first challenge was to make a good representation of the cube using Objects in OOP. I chose to use Test Driven Development (TDD), and I didn’t regret that at any moment. Writing a complicated software needs a lot of attention on details and requires keeping track of every algorithm, and that is impossible to be done without TDD, especially when you are not developing it every day, because it’s a pet project and you spend only a fraction of your free time on it. Without the test, you will be lost after 2 weeks development for sure, and you’ll never know if any of your changes break something until you apply all the steps to the cube, which is time-consuming and exhausting.
After several unit tests and objects, I was able to make first console application where I could visually see how my application was progressing, from scrambling to solving cube variations. When I was done with the algorithm and it passed all unit test, the application was able to define a Solved cube, scramble it, and solve it using the “Beginners method”, it was all done in ~200 steps. I was so amazed and proud, not that I did something that wasn’t done before, but because I did it completely by myself and my pet project was up and running.
Raspberry Pi
Having an algorithm that solves the cube, and only works as a console application is not much fun. It is so abstract, it solves a real problem in the abstract environment. You can’t see/feel the actual solving, you can only define a matrix that represents a cube formation/combination and the algorithm will give you a set of rotations that you should perform to solve the cube. Next phase for me was to build a robot that will solve the cube. The only thing that it should do is to apply the steps of the algorithm output to a physical cube. I have never ever built or programmed a robot, I didn’t have any idea where I should start from. My idea was to have a motor that will do the rotations on the cube, that was the simplest model that came to my mind. After researching a little bit on the internet, I found out about step motors.
A stepper motor is a type of DC motor that works in discrete steps. It is a synchronous brushless motor where a full rotation is divided into several steps.
Perfect, this was what I needed. I needed something that can make a 90 degrees rotation. But wait, to be able to control a step motor you need Arduino or Raspberry PI. I had zero experience in this area. I had never ever touched Arduino or Raspberry Pi, it was a completely mystic world for me. So, I decided to buy Raspberry PI and Arduino, just to explore them and see if I can do anything. After a month, it was delivered in my home and I started a whole new chapter in my computer experience.
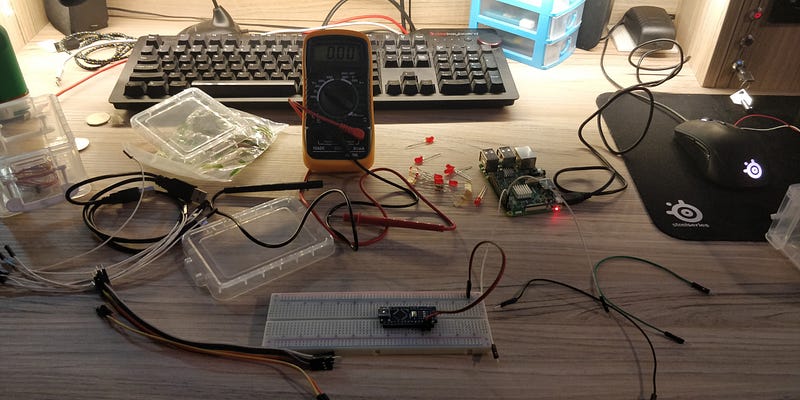
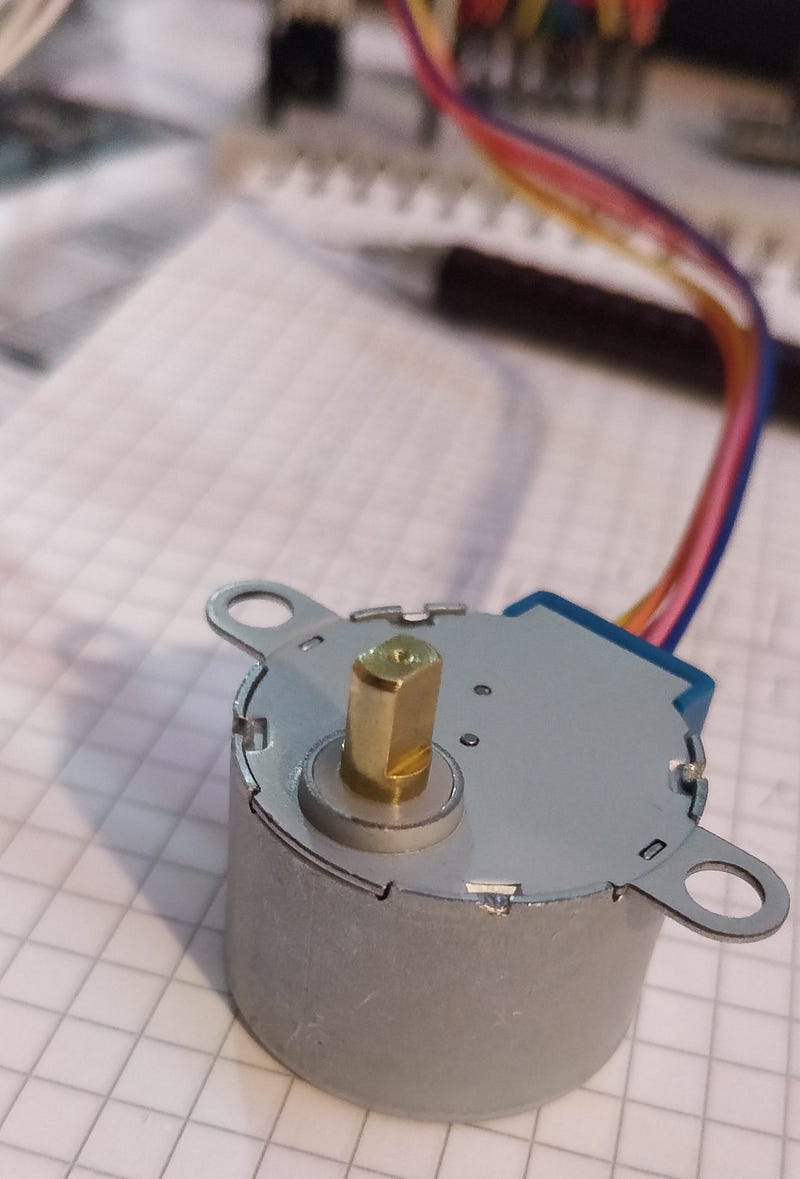
After a while, I decided to continue with Raspberry Pi. It was easier for me because it was working on a higher level than the Arduino, and it has an operating system that you can use. I have never used a Raspberry PI, it was a completely unexplored world for me. So, my journey with Raspberry Pi had just stared. I watched several tutorials on YouTube, to get some basic knowledge of the domain. For the first time in my life, I wrote a script on Python. Apparently, you can do a lot of stuff using Python, there are a lot of libraries that will help you program Raspberry Pi pins. I wrote a sample Python script that will turn off and on LED, I was happy as a little child. In my childhood I was playing with LED and batteries, it was fun of course, but now I’m able to control LED using code. Amazing. After that a lot of ideas are floating in your brain, you can automate or program a lot of your daily tasks/routines. But I was stuck with my first idea, to be able to control a step motor to make 90 degrees rotation in a given direction. As I searched, I found out that there are several types of step motors. I wasn’t sure which one I need, so I bought the cheapest one (28BYJ-48 5V 4 Phase DC Gear Stepper Motor). Just to test it. After a month it was delivered at my home and I started to explore it. Of course, you need a driver (ULN2003 Driver Board) that will process your input and accordingly control the step motor. I found a few scripts online that were easy to use and implement. After a few hours, I was able to control my step motor and to control the movement by programming the number and direction of the angles.
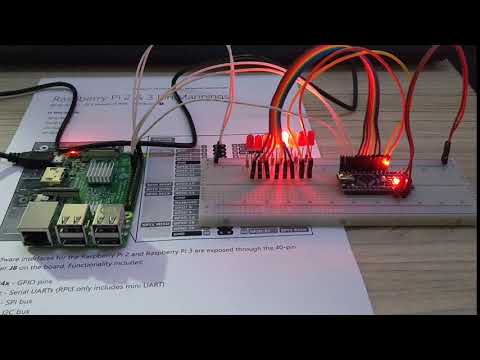
I was so happy. The motor seemed to be very strong and had a high torque. I was sure that if I had 6 motors, one for each side of the cube, I’ll be able to control/solve the cube since I have the algorithm that will calculate the needed steps. I ordered 6 new step motors and 6 drivers for them, after a month, they were delivered, and I started to connect them to my Raspberry Pi. To spare some pins I was experimenting with Arduino Nano. I programmed my Arduino Nano to act as a multiplexer. I had 6 motors that should be running, but only one of them will be active at the given moment.
With that logic, I was able to use 3 pins from my Raspberry to control which one of the 8 outputs (I needed only 6) of the Arduino Nano will be active (2³=8). But after one day spent with this one, I gave up on this idea. Luckily for me, there were enough pins on the Raspberry to connect all 6 motors directly to it. I was connecting the step motor drivers to the Raspberry Pi. Each driver has 4 signal + 2 power pins. After playing around for some time, all the 6 motors were wired up and I was able to control which one of them will rotate, for how long and to which direction. Great! Now I could control 6 motors, one for each side of the cube. I just want to mention that I fired 2 or 3 motors while testing, I considered it as a part of the development process, no worries, except that you will need to wait for a month for the delivery of the new motor from AliExpress.
API and mapping
Now I have all 6 motors connected to Raspberry Pi and I can control them. Great. Now I need some service that will provide me with a list of steps that should be applied to the cube. I developed a simple API service that will return a list of solving steps. Raspberry using Python should be able to connect to this API service that will return the list of the steps required to solve the cube. But to get some result from the API you should somehow pass the current state of the cube, so the algorithm can make the calculations and return them via the service. Now I need a web interface where I can map the current state of the cube. I developed a simple website using JavaScript where you can map your Rubik’s cube, and according to your state the algorithm will calculate the steps and store them, so when you call the API from Python it will return you the steps. The website now is enhanced, and it provides the required steps on the web to solve your cube at home. (some screenshots here about the website and how to use it). Now I have a website where I can map my cube and a service that will calculate the solving steps, also my API can return those steps in a list that can be used in Raspberry Python code to control the motors.
Wooden era
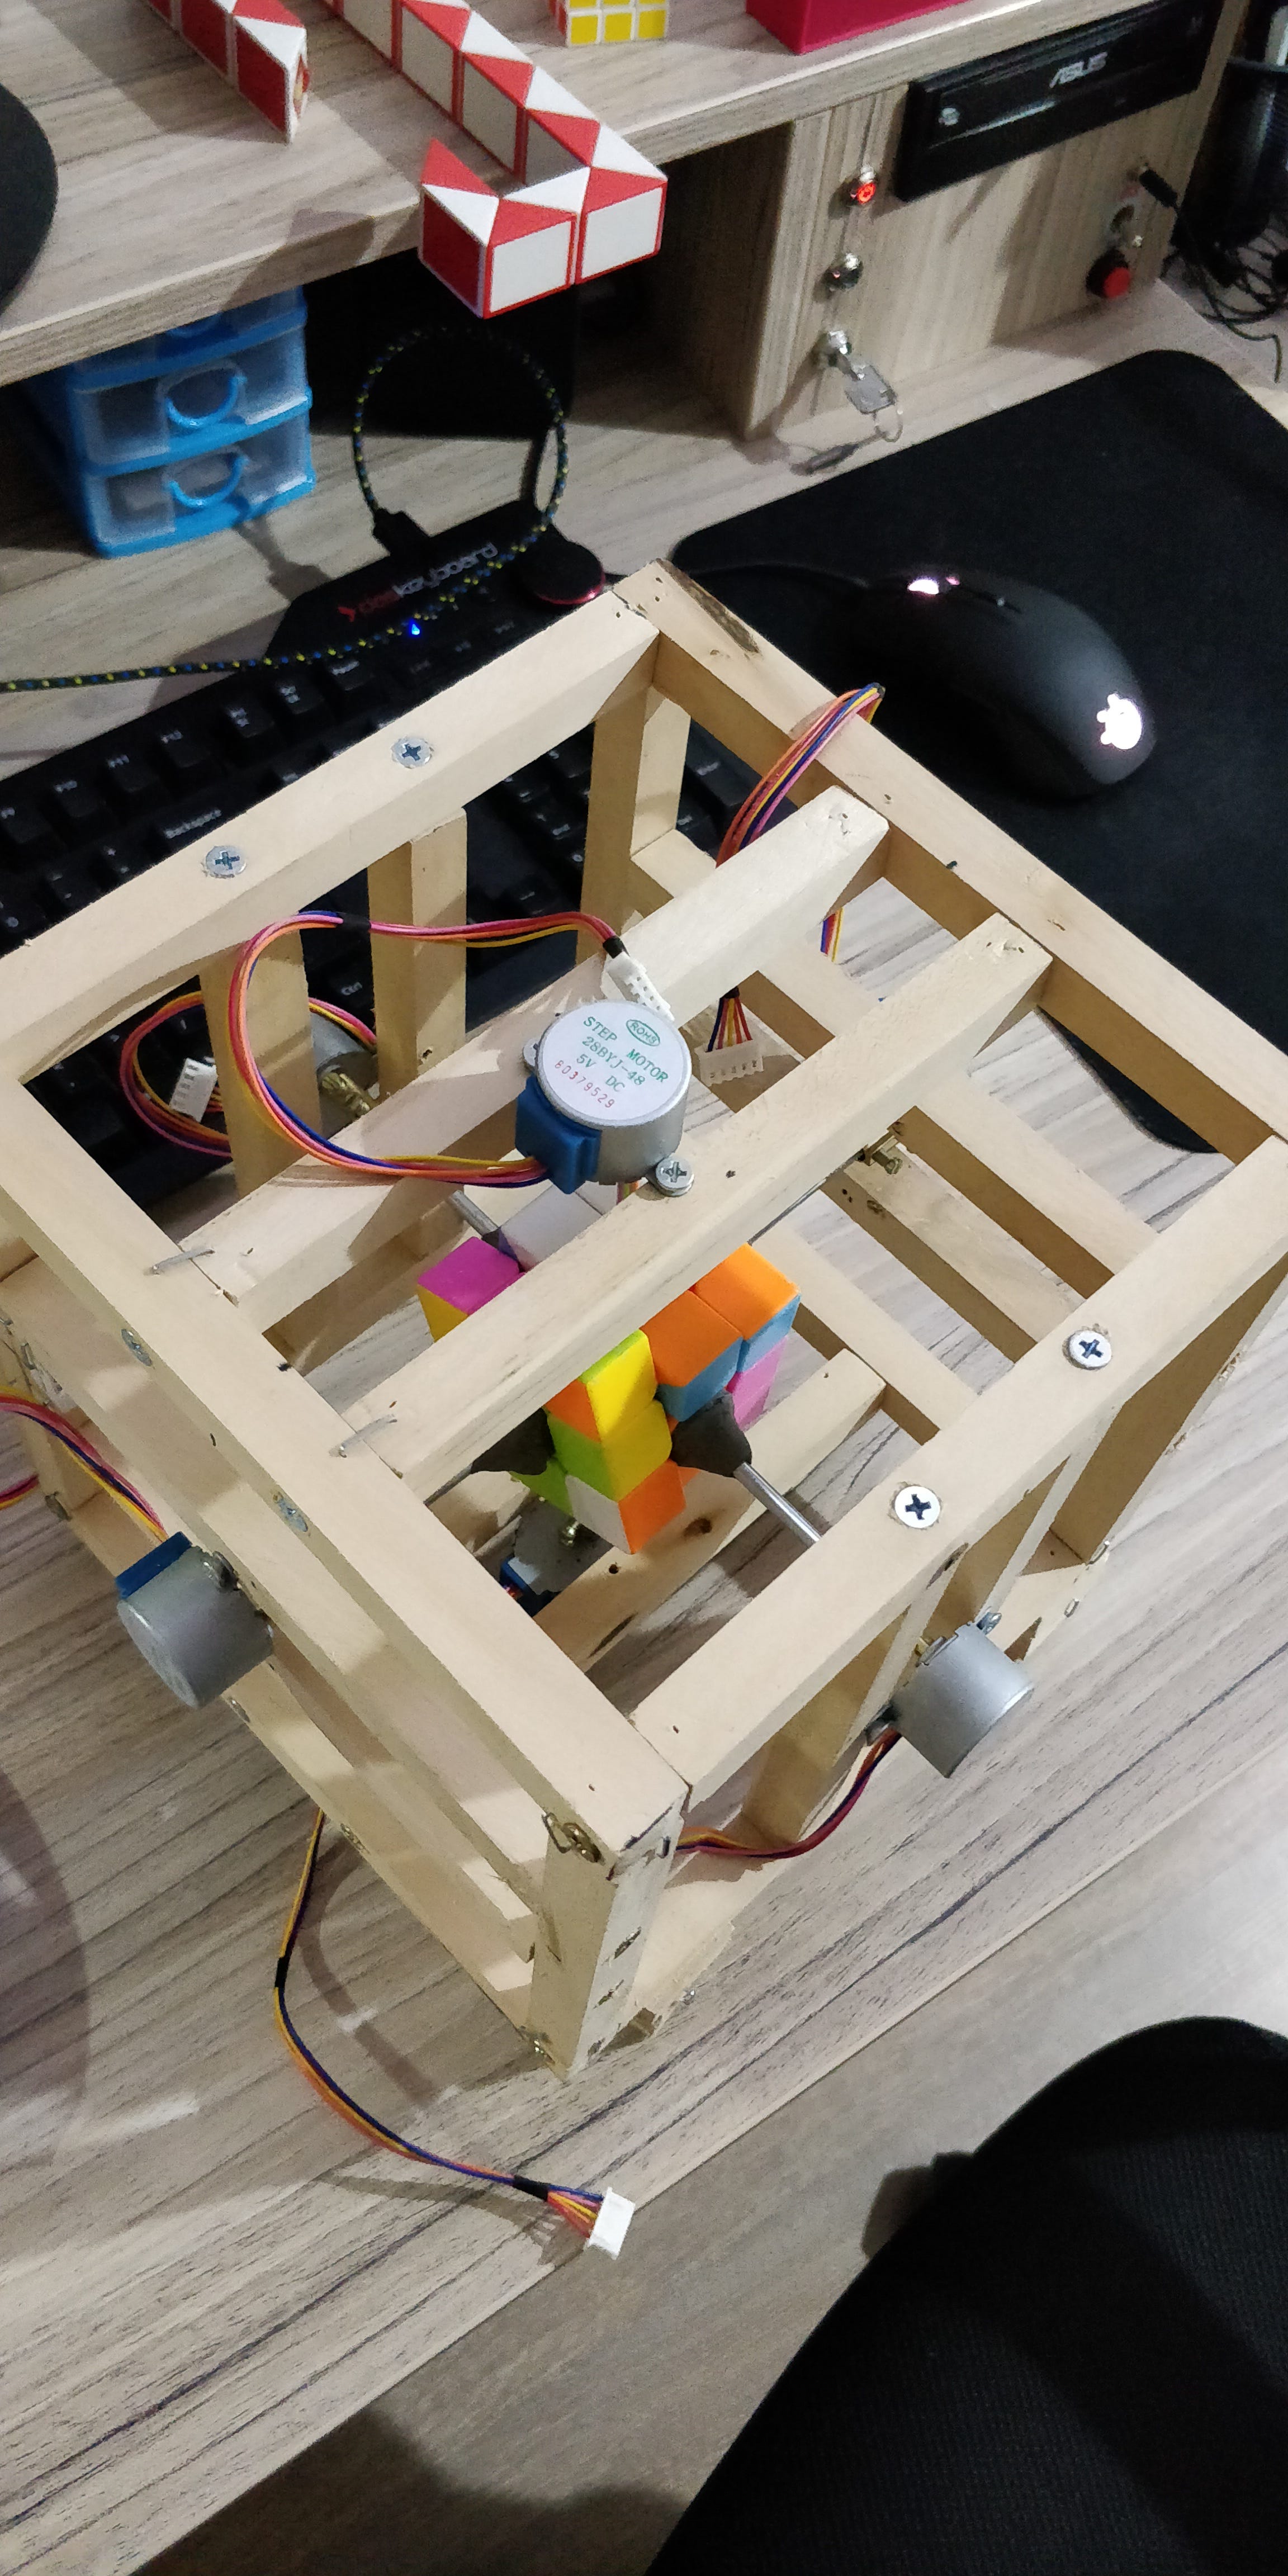
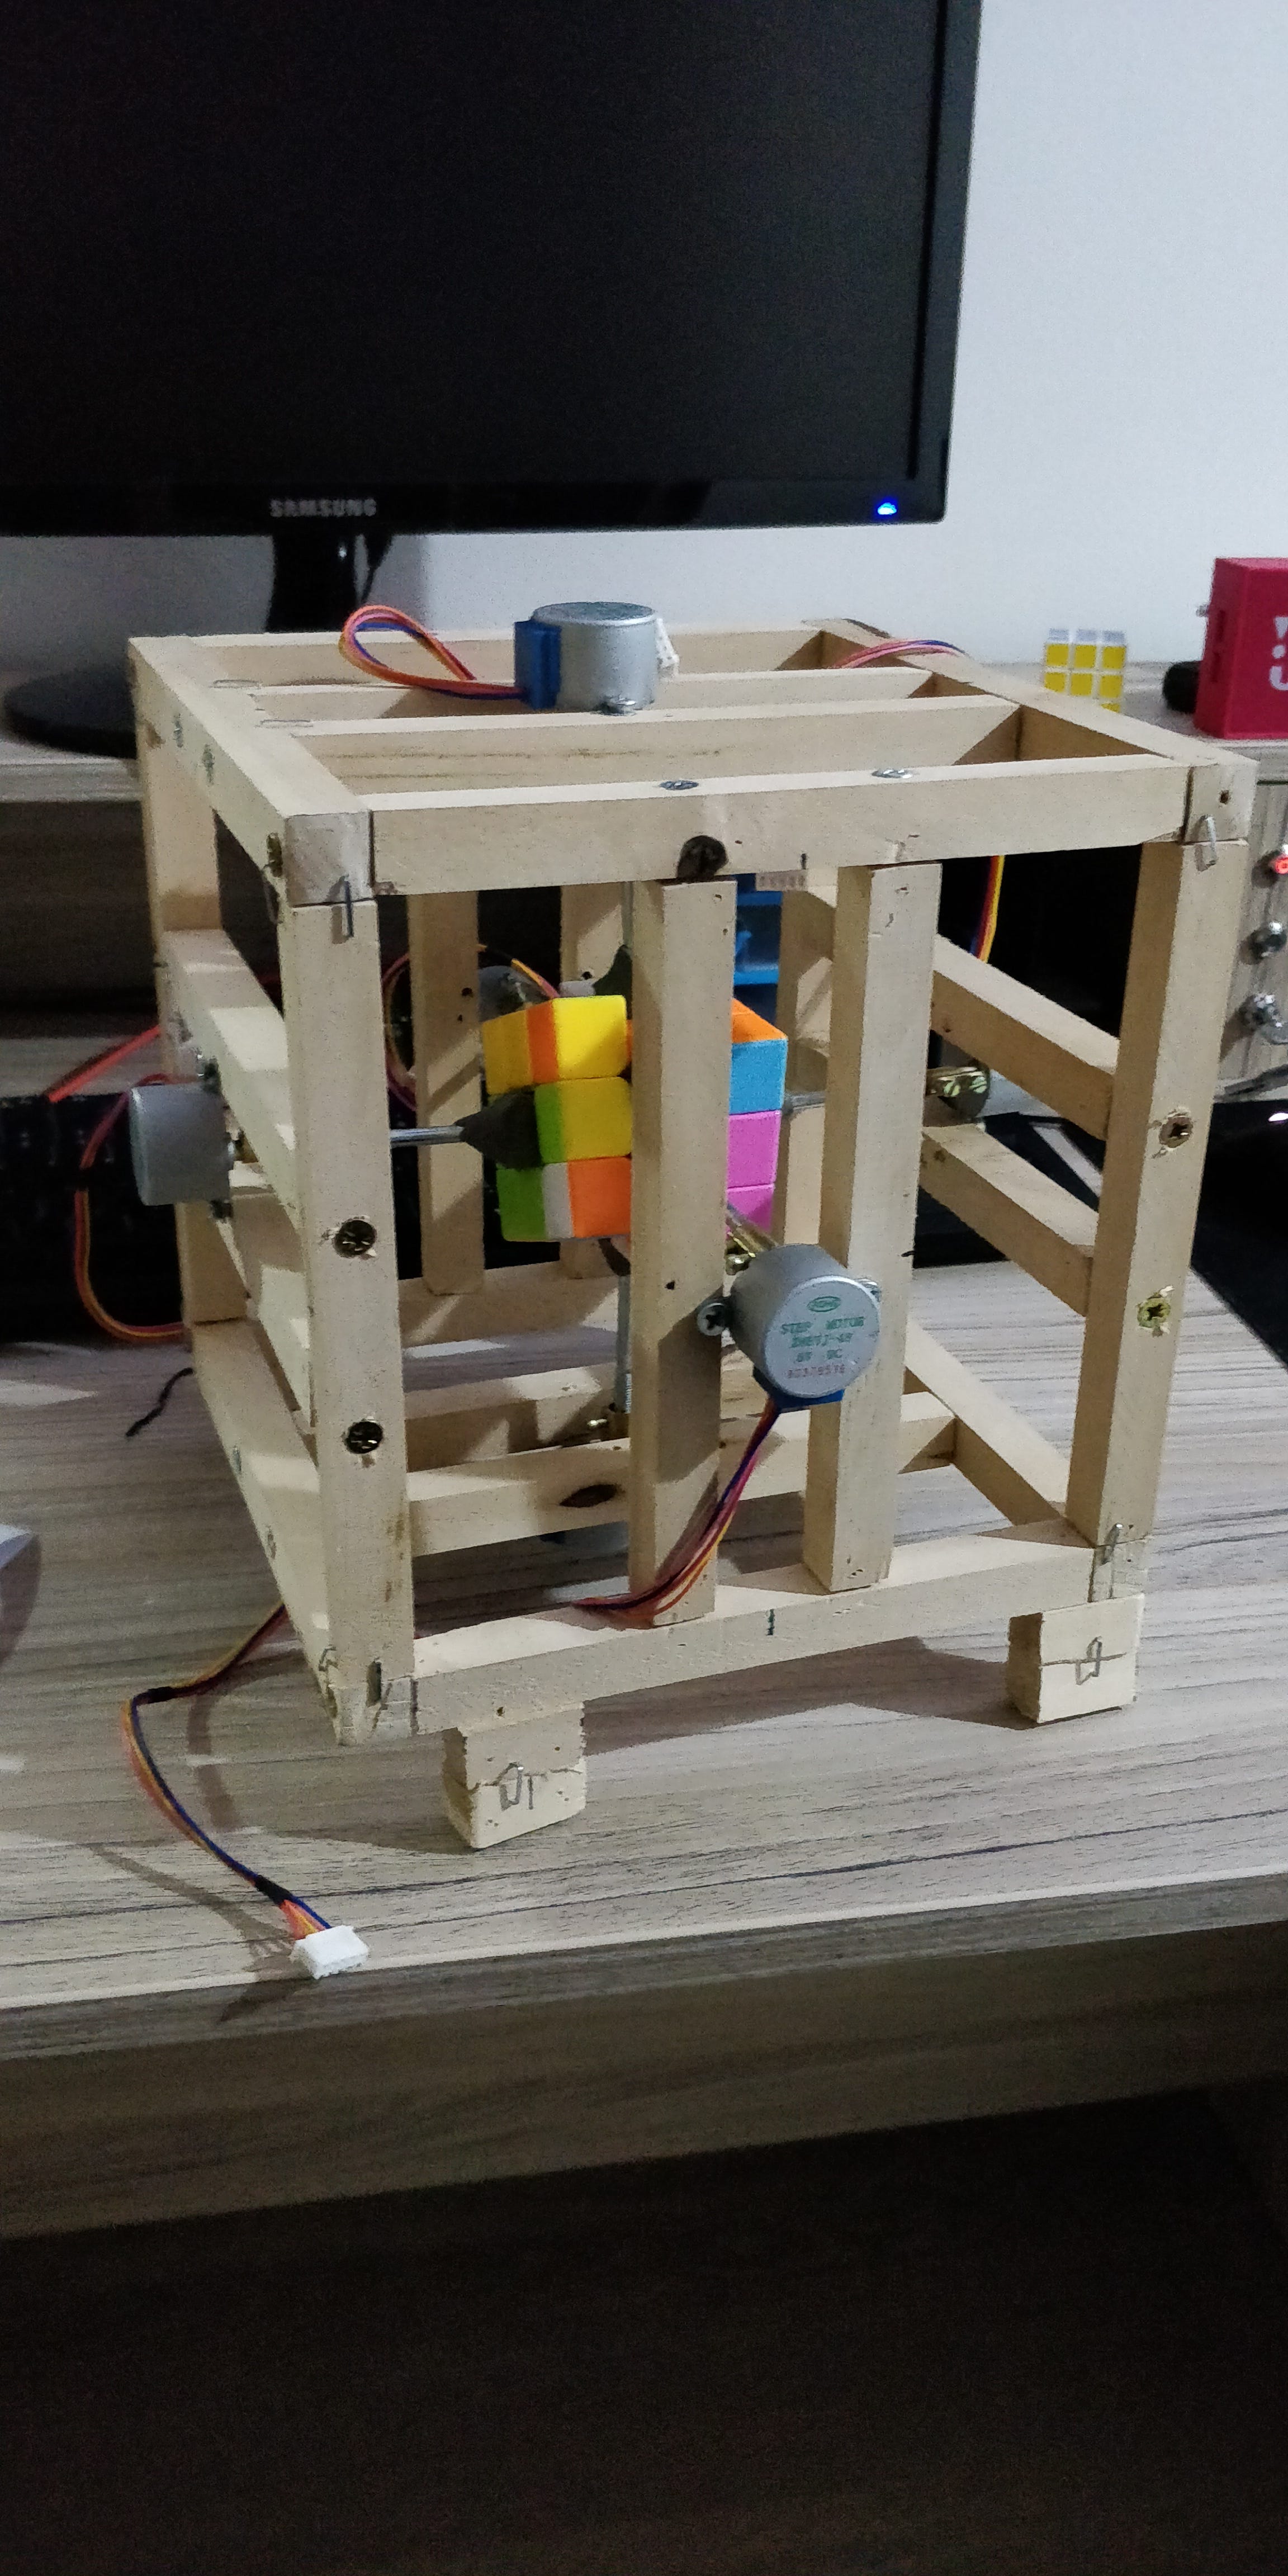
Having all the 6 step motors wired up and running, the next thing was to construct a frame that will hold all the motors and the cube between them in order to rotate the cube sides accordingly. Simple idea, only I needed to find a way to connect the step motor shaft with the center of each side of the cube. See the screenshots of my first connection. I was using a screw and a type of epoxy compound to construct something that will connect the shaft and the cube center. Now what is left is to construct a frame. I made a wooden cube that will hold the motors and the cube in the center. I did it, I have my first robot construction, I wired it up and it was working. Not as it should, but yes, it’s something. It was able to do a rotation, but not as I wanted. Because the frame wasn’t precise I think, the cube did not hold in the absolute center position and the motors weren’t able to do an exact 90 degrees rotation. Sometimes they were, but in most cases, they weren’t. If one of the sides was rotated for 85 degrees, next, the other side was unable to rotate because the previous one stands on its way. I was disappointed a little bit, maybe more than a little bit, but still, never give up.
Wooden Era ||
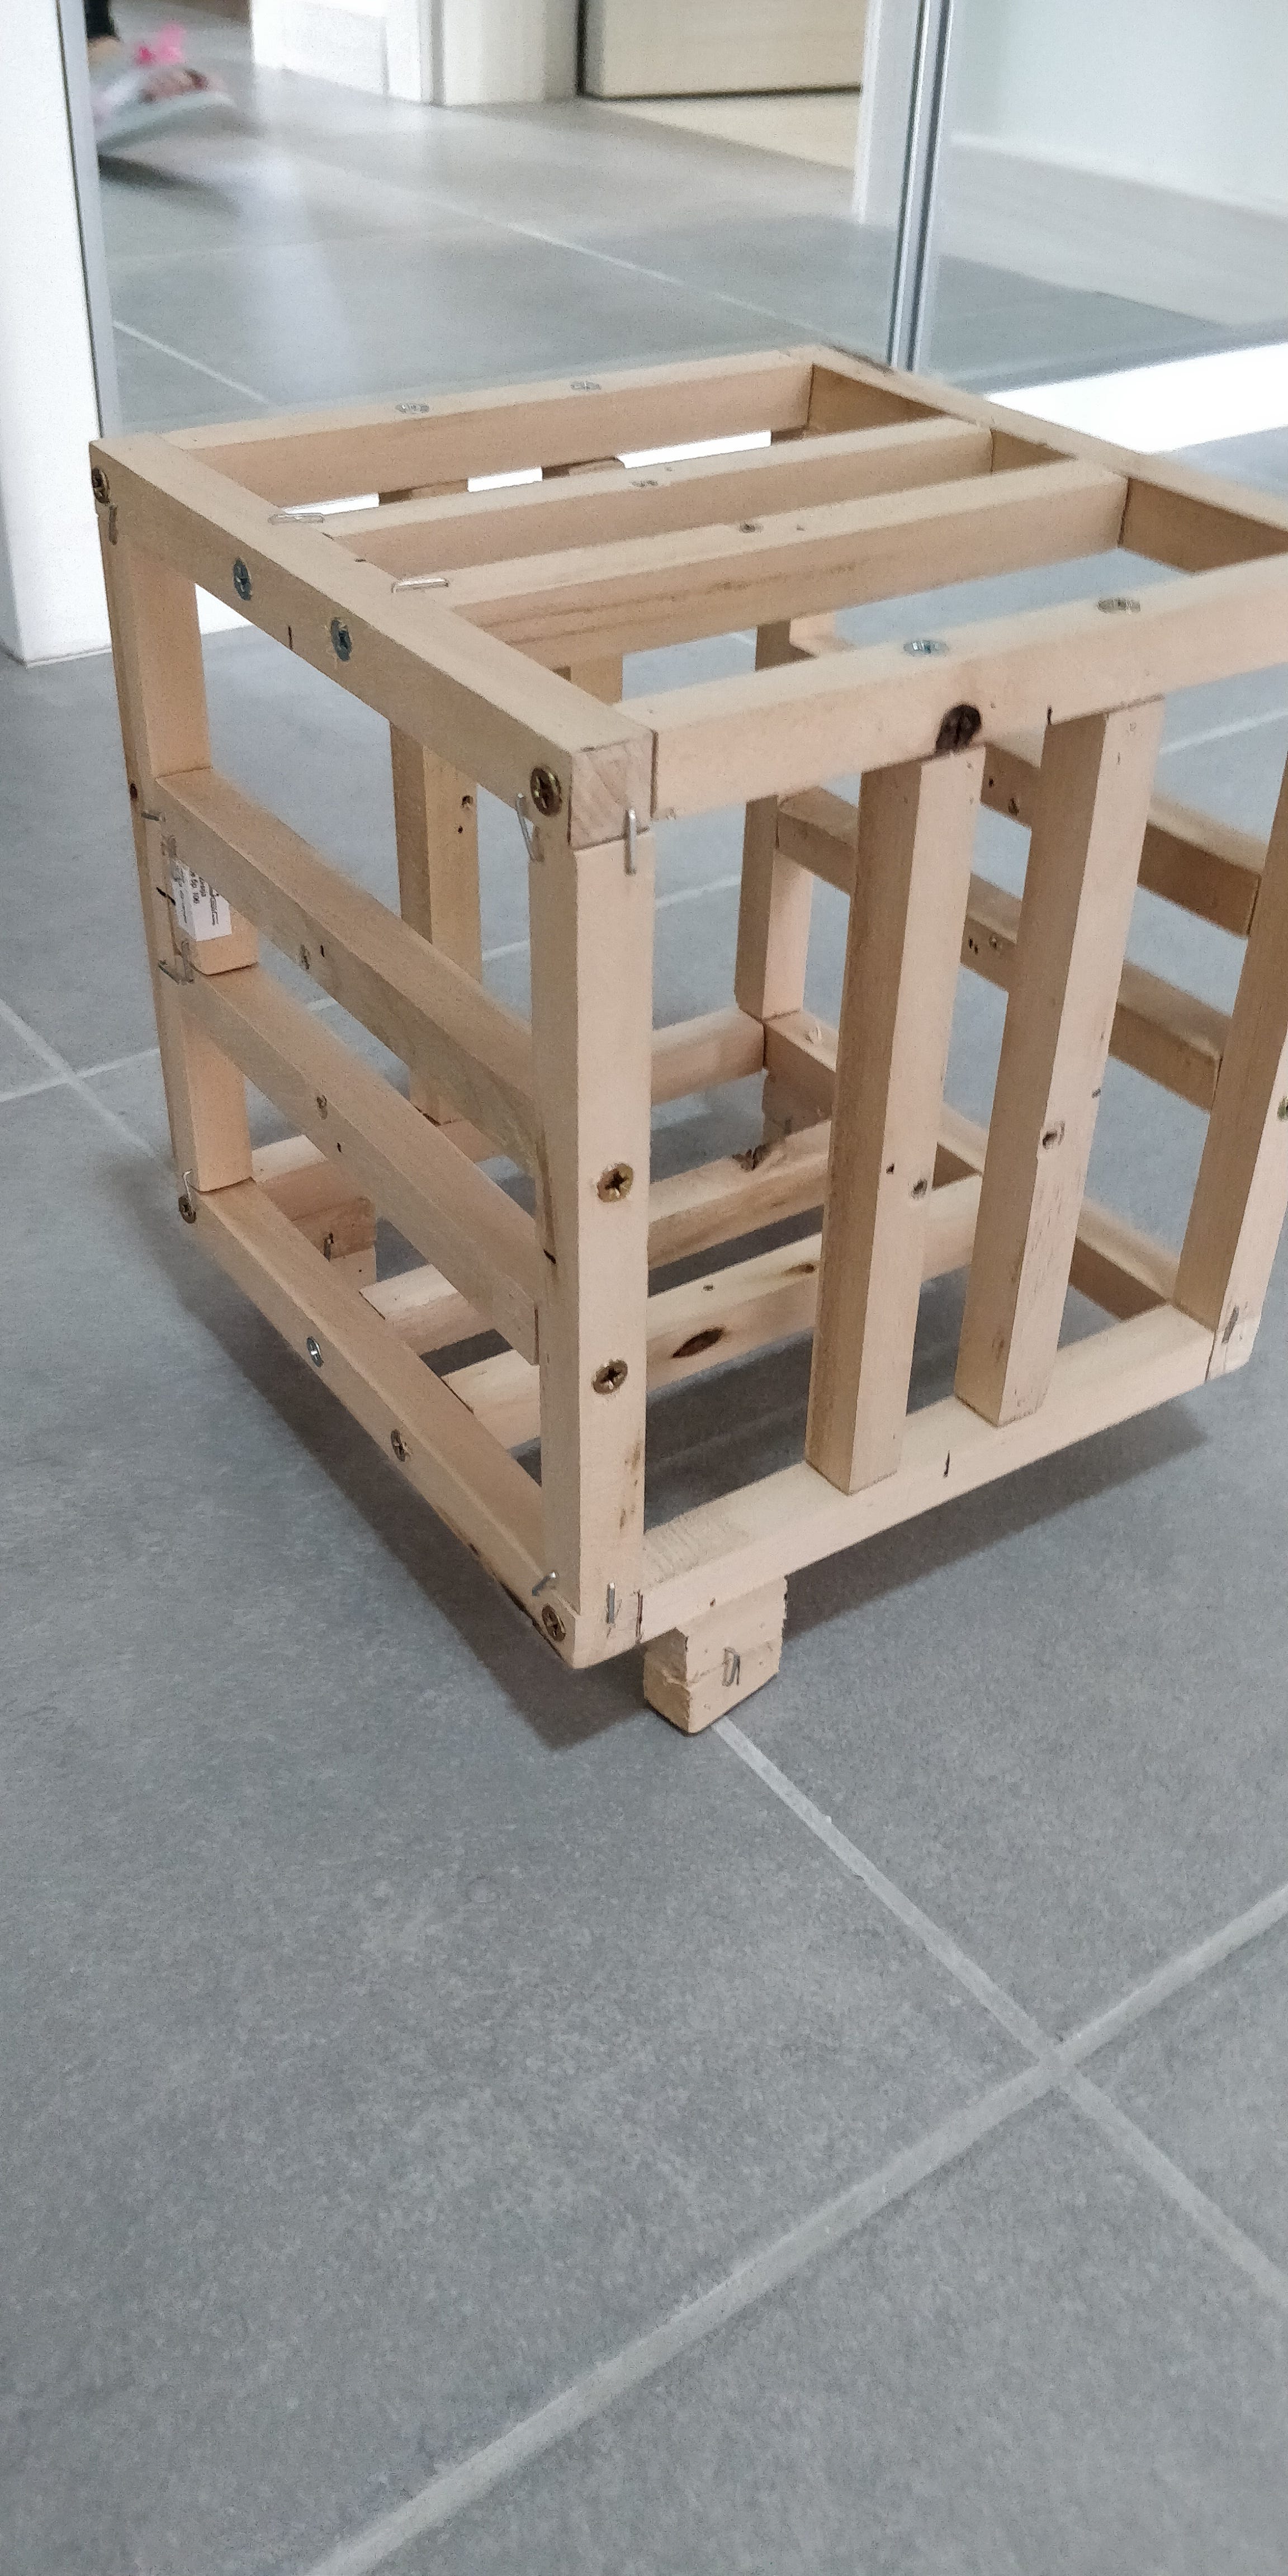
Next stage was to find a better connection between the cube and the shaft of the step motor. I found something on AliExpress that will do the job. I ordered it immediately. 12 of them, just in case. Since I was changing the connection between the shaft and the cube side, I decided to make a new wooden frame, that will be more precise and way smaller. I did it too, I was getting better in wood craftsmanship (Don’t ask my wife about all the mess I did in our apartment).
The connectors arrived and I connected them with the shaft and the cube center using the new wooden frame. This should be it. But it wasn’t. Same old, same old. It had a little improvement but not enough. Now the rotations are between 85 and 90 degrees, but because of the small torques (which, in the beginning, seems to be enough) of the step motor, you can’t predict what will happen. You don’t have any feedback from the motor, you only send it a command to do 90 degrees rotation, but you don’t know if it does 90 or 80 or even 0 degrees radius. I mean you can see it visually, but the raspberry doesn’t have any idea (maybe in future I can extend this project to use a camera as a sensor for feedback, but maybe).
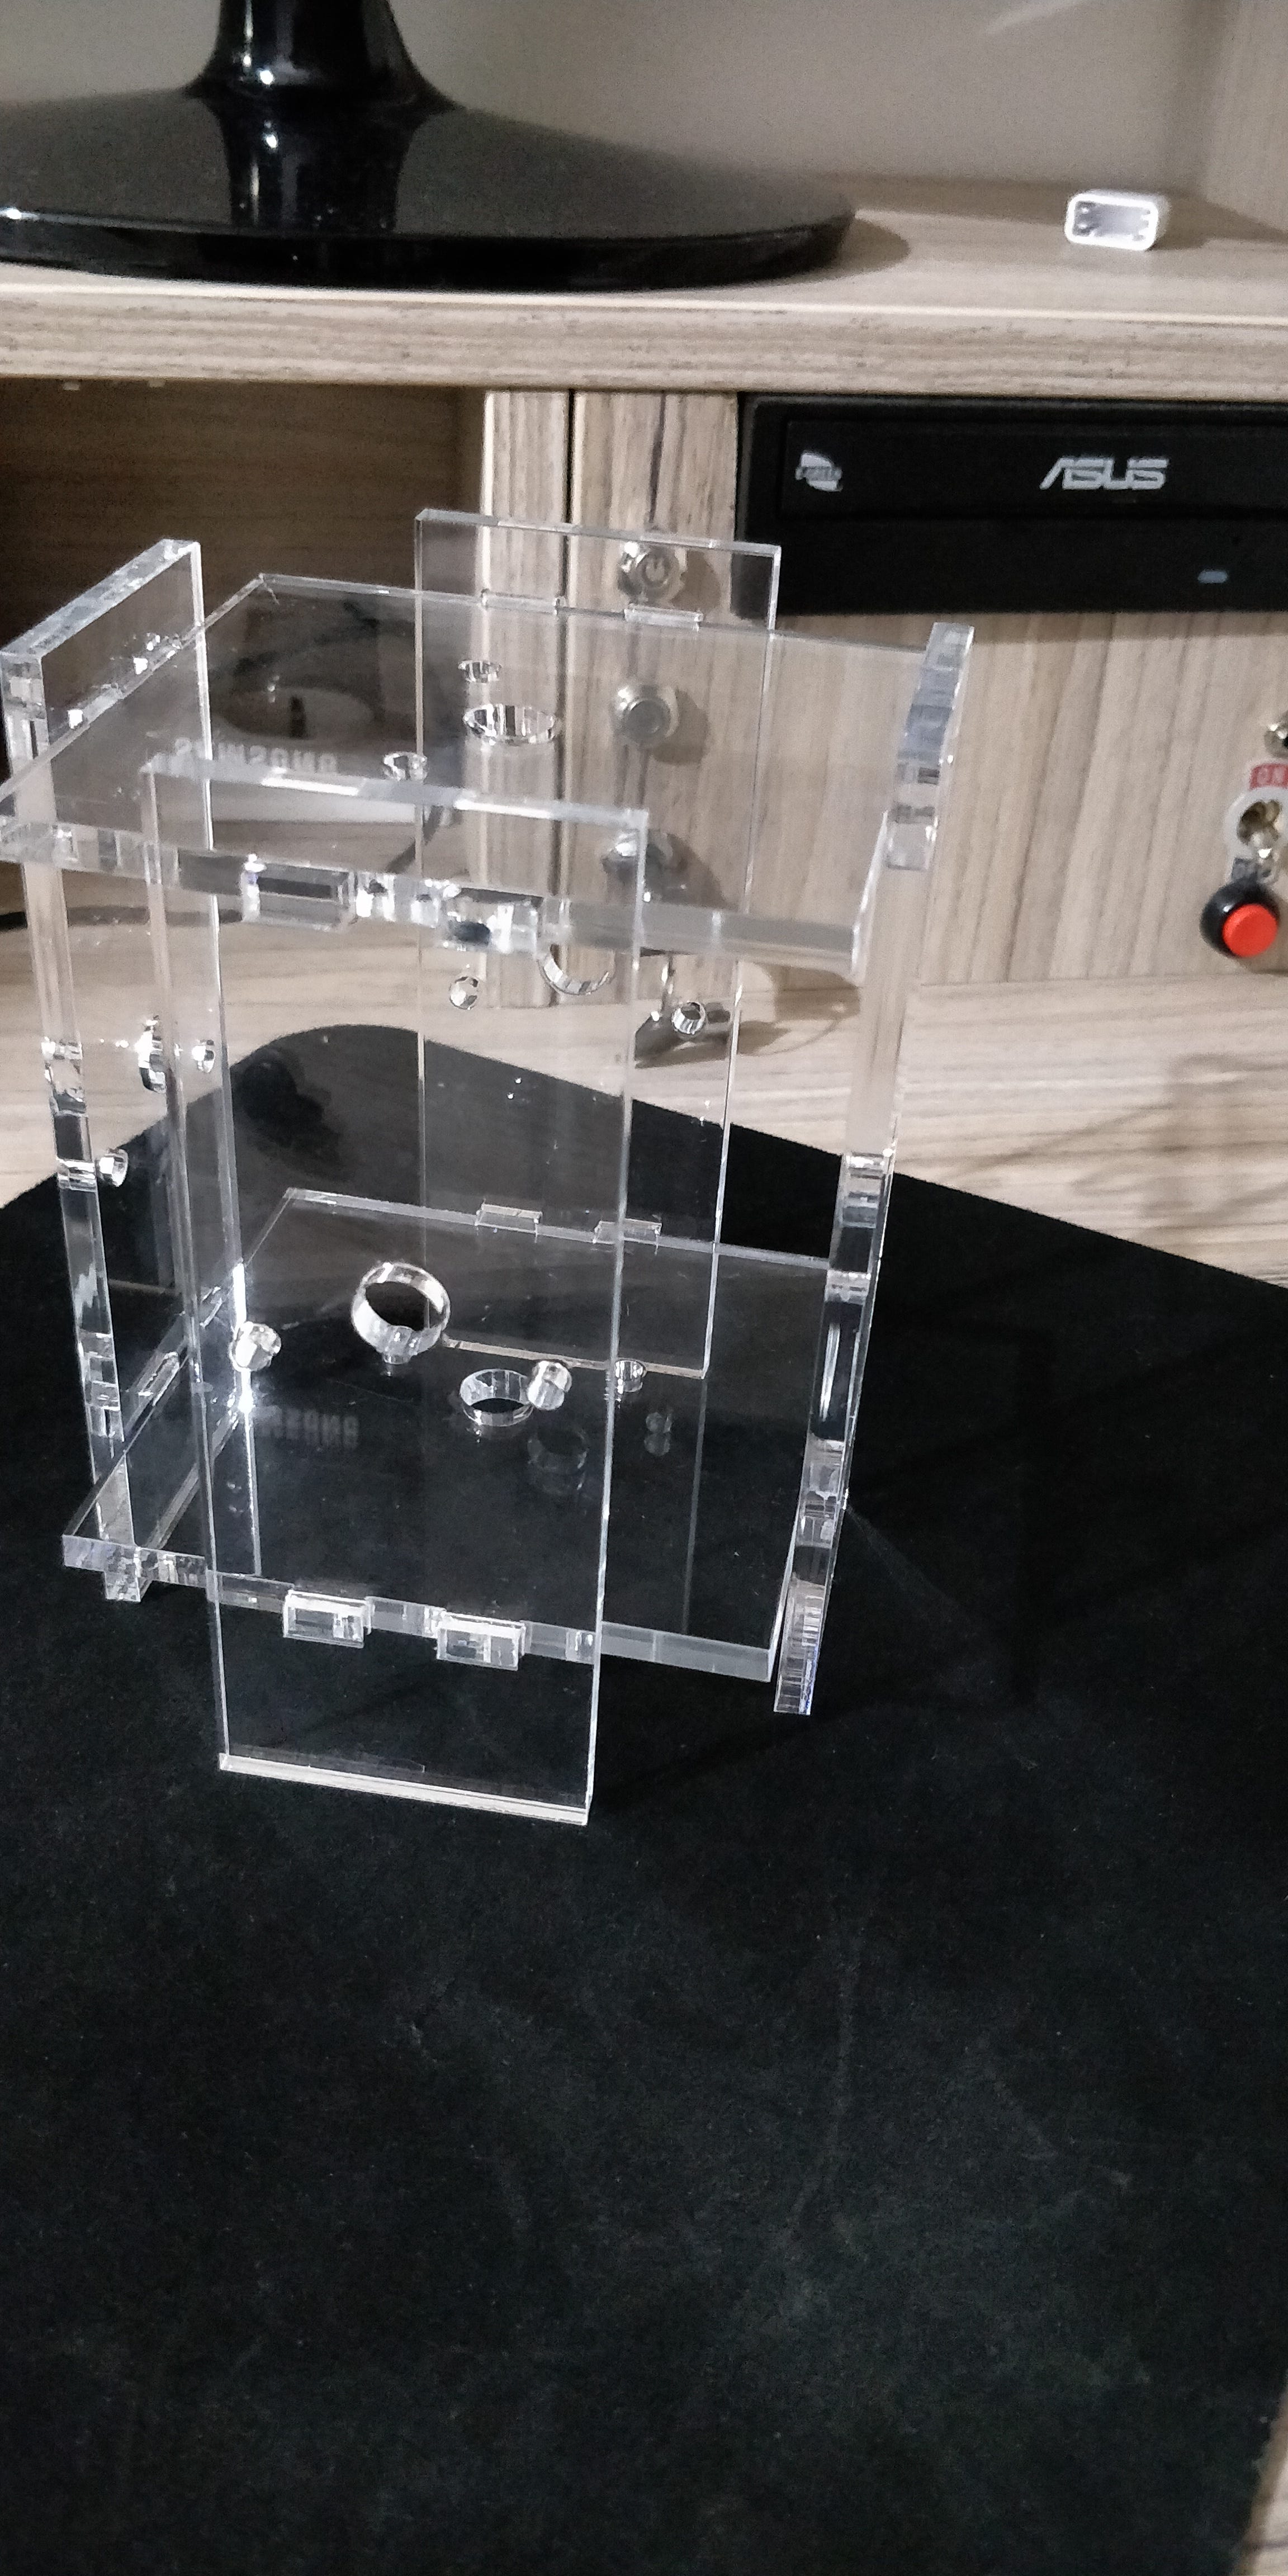
Plexiglass era
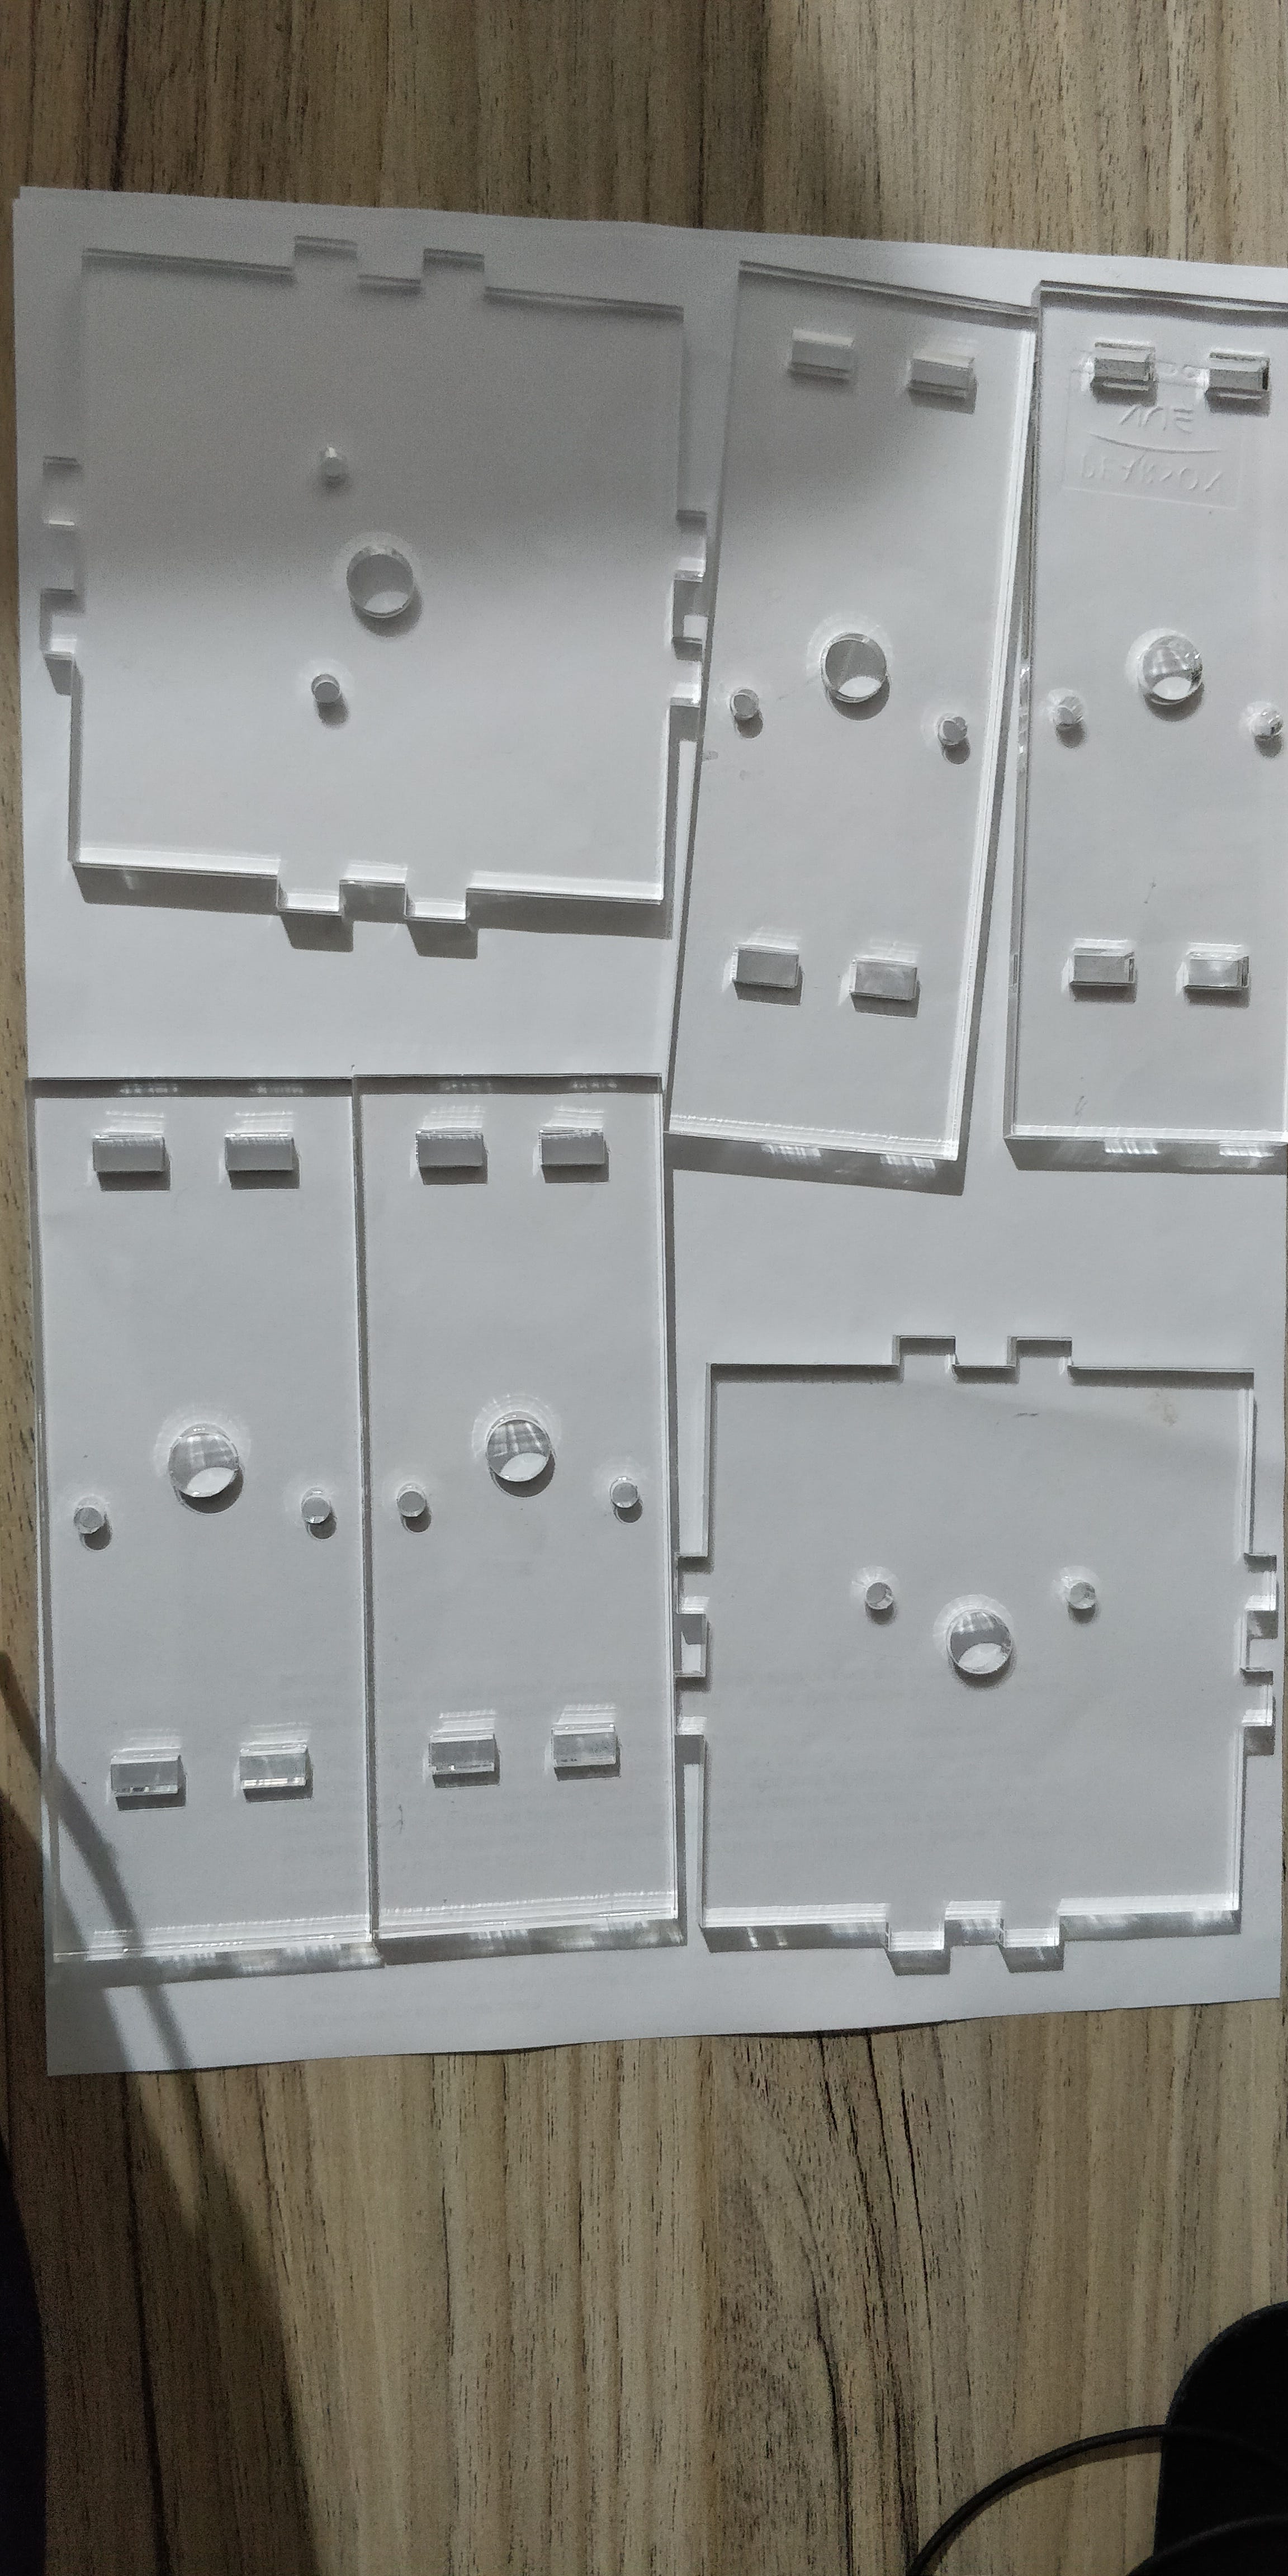
Ok, now I have a new connection between the shaft and the cube, but my wooden frame is not precise enough. I need something that is more precise. I found out a local store in my town that has a laser cutting machine and can apply my design on Plexiglass. I installed Adobe Illustrator and started designing a new frame for my robot. After several hours it was designed and ready to be produced. I contacted the company, send them my design and they produced it in two days. I was so happy. I pick up my new plexiglass frame, attached my step motors and the cube. It’s testing time. I mapped my cube on my website, run the API call, it received ~200 steps, and started rotating the sides. It was great, but for only for the first 3–4 rotations, then I had the same problem. Rotations weren’t exactly 90 degrees. Now everything depends on the step motors rotation torque. I was a little bit disappointed and almost out of ideas and hope for my Rubik’s cube solving robot.
Nema17
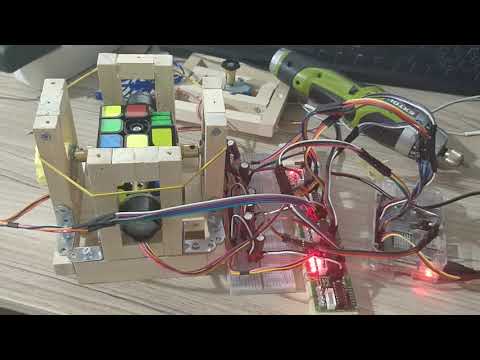
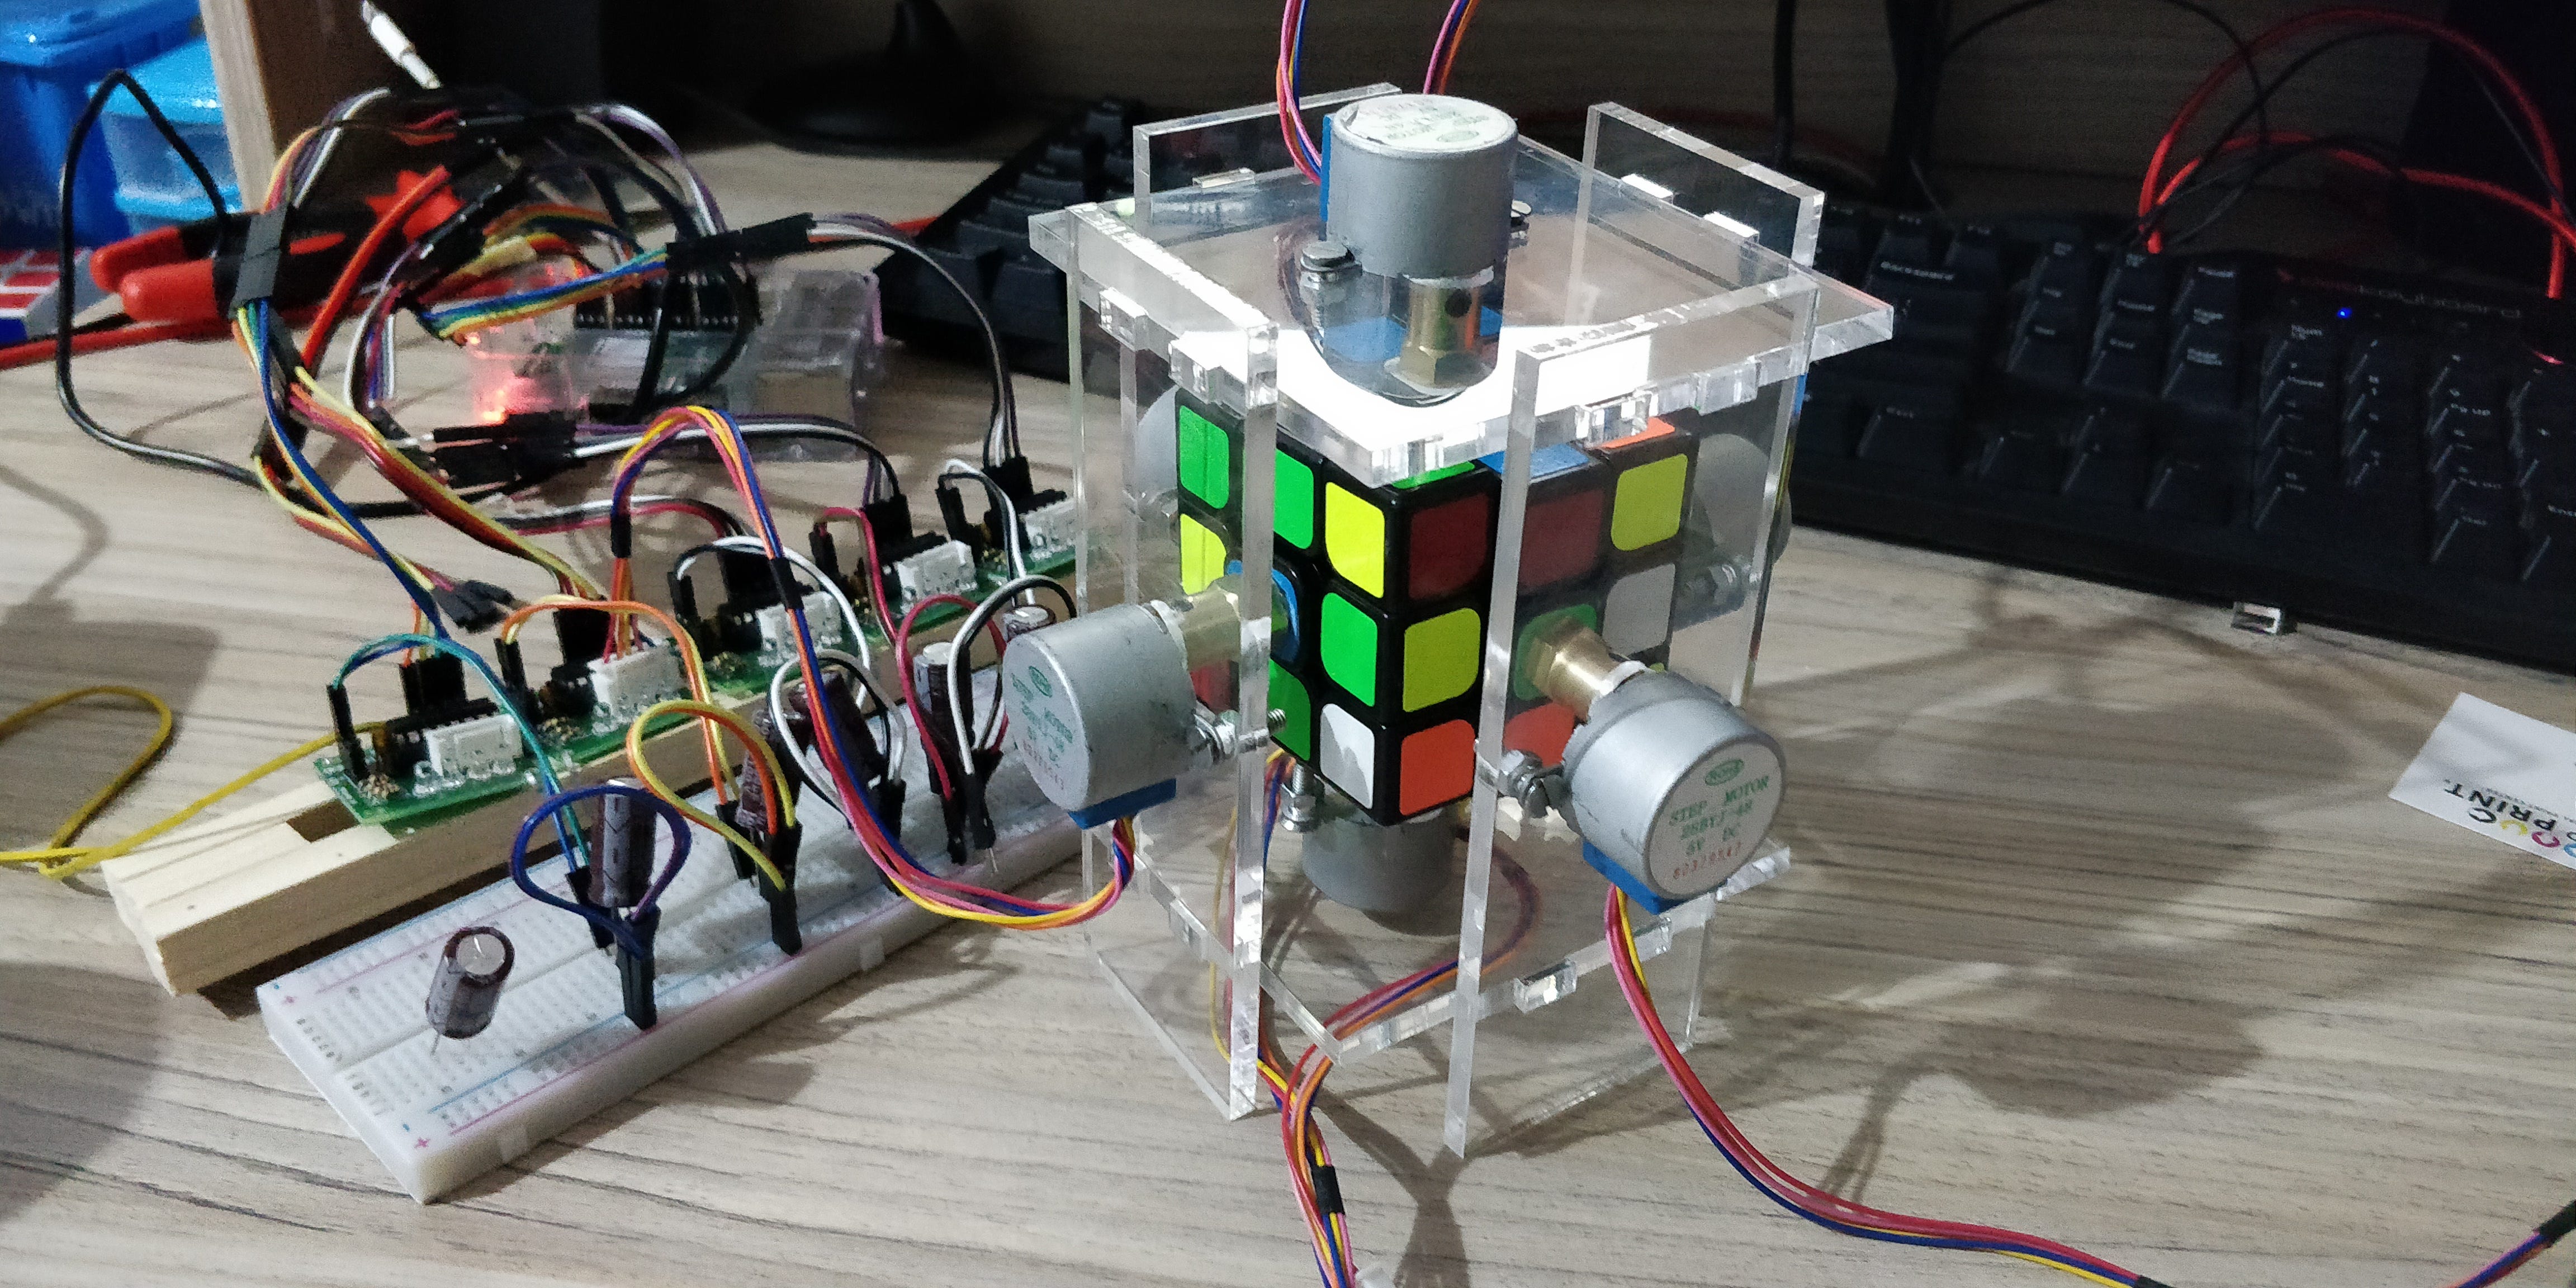
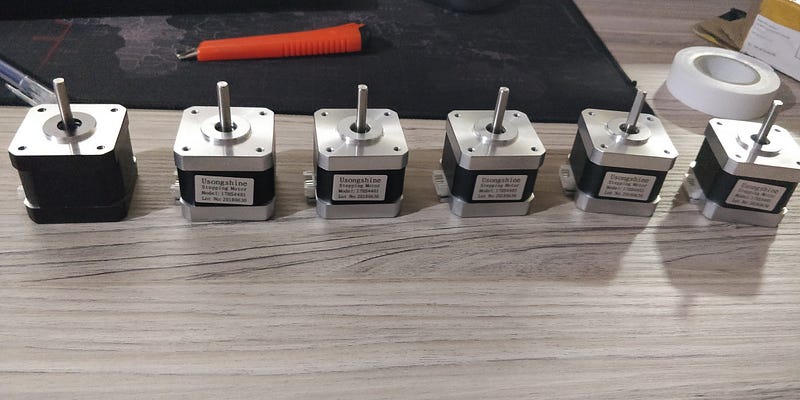
After researching again, I found hope for my robot. I found out that a lot of moving machines (CNC machines) are using NEMA standard motors. I found out that Nema17 step motor will do the job. I have seen this step motors previously, but they were expensive for me in the beginning. Now they seemed like the only hope for my project. I ordered one of them just to test it, of course, they use different drivers, so I bought a new driver (they were cheap). According to some YouTube videos, I need to use a capacitor between the power supply and the step motor driver, that was something that I didn’t consider previously. I bought several of them, they are cheap too. After a month, Nema17 step motor arrived and I tested it. I was surprised by how strong and powerful it is. Immediately I ordered 5 more, so I can attach one to every side of the cube. Again, after a month, I have 6 Nema17 step motors and 6 new drivers, and 6 capacitors. Now I need some power supply that will provide enough power. Previously I used a simple DC adapter, but it wasn’t enough. After talking with one colleague of mine, he suggested using a desktop computer power supply. It has enough power to supply 6 motors with no problem. I already had a spare power supply at my home, so I used it.
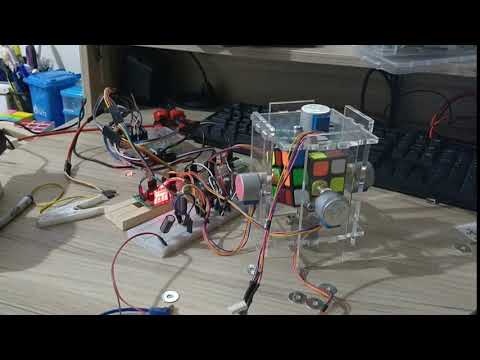
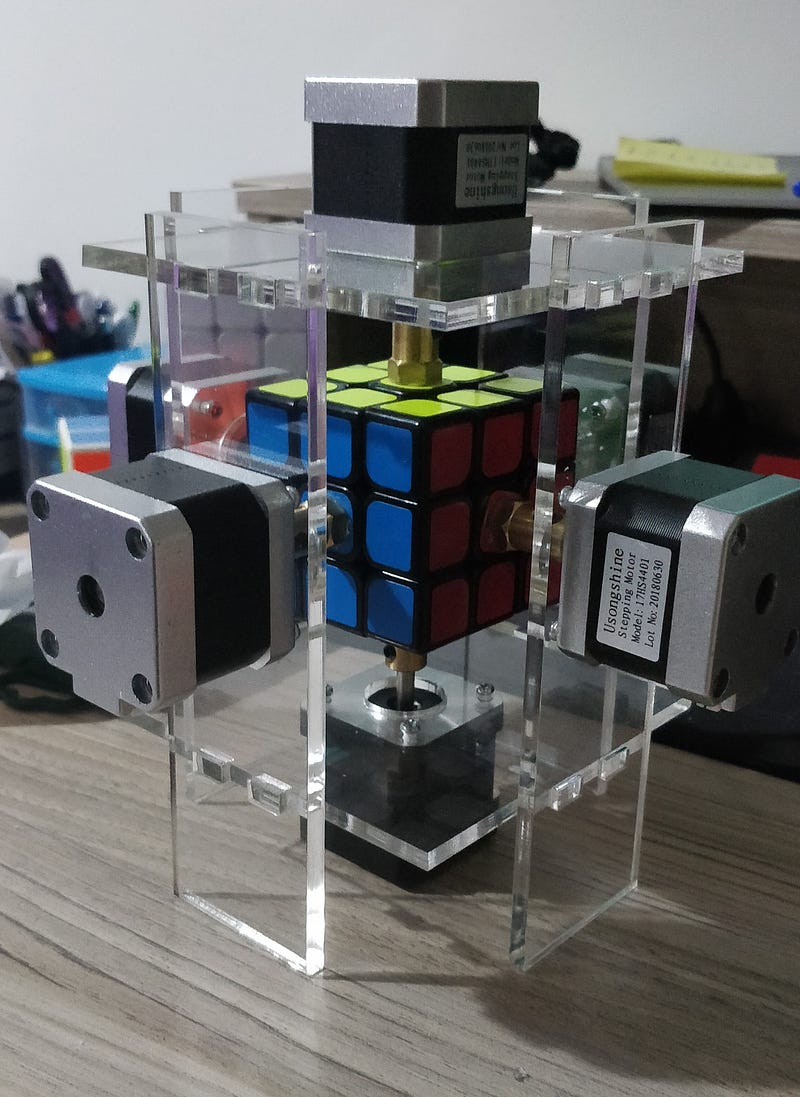
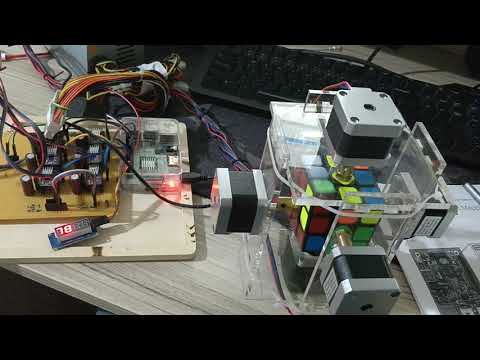
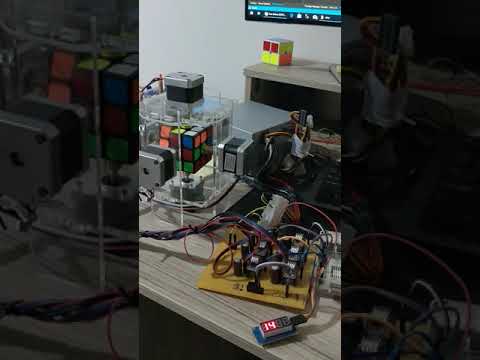
Now, with all 6 motors connected to the power supply, I needed a new frame (again), because the Nema17 motors have different dimensions that required a completely new frame. This time I didn’t even consider using a wooden frame, I immediately designed a new plexiglass print and ordered it. After a day or two, I had a new frame. I connected everything, and it was working!!! Finally! I was so happy; my cube was solved by the robot. Eureka! It’s 2 AM in the morning, I’m excited as a little child, I need to solve the problem with all the wires in my desk, but before I spoil anything, I decided to go to sleep, because first time after 10 months I see my robot solving the cube.
Soldering and PCB design
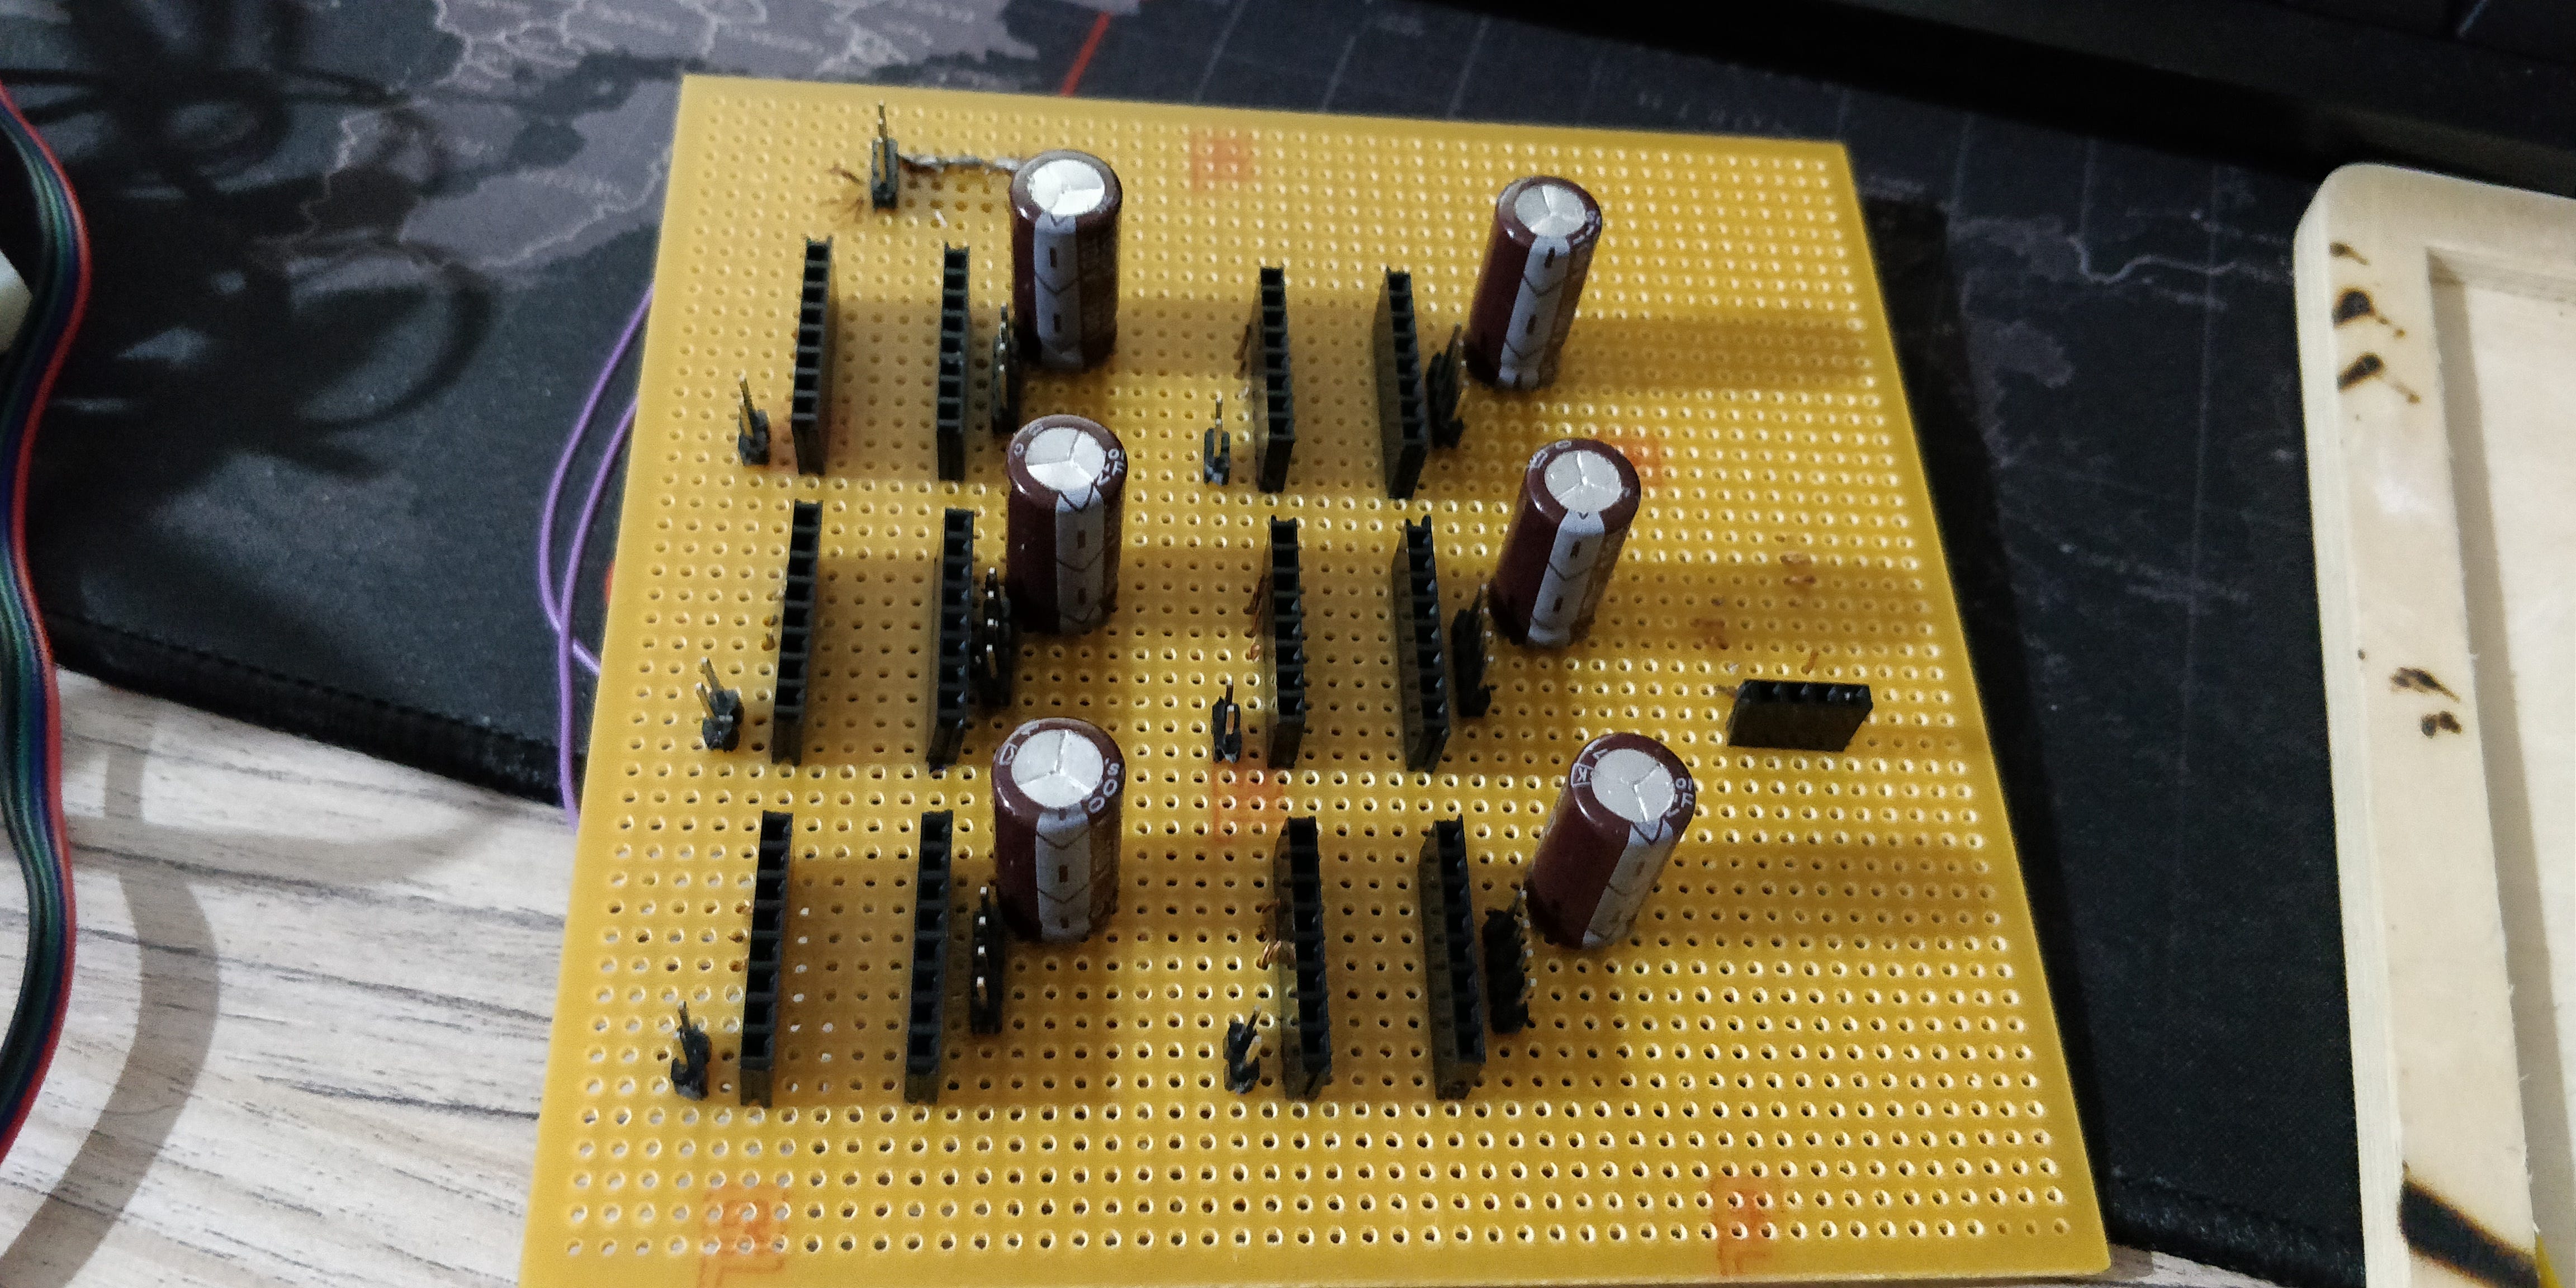
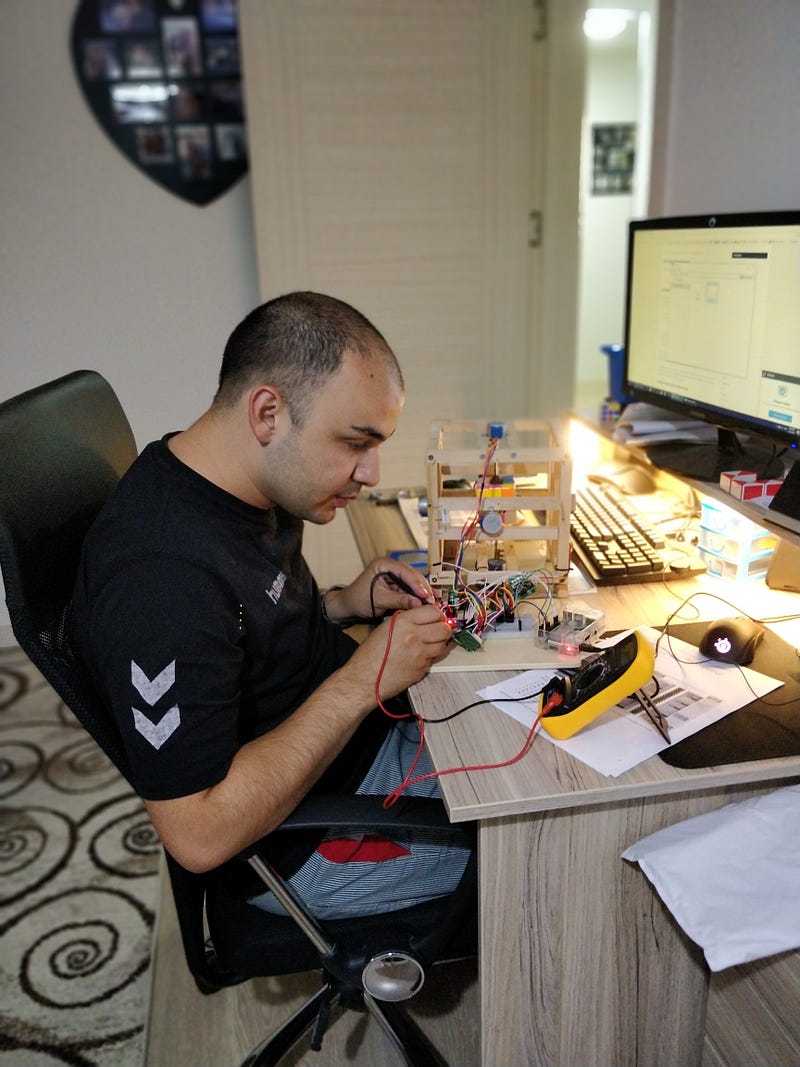
Since I had 6 drivers connected to my Raspberry Pi, each one of them with 3 control pins, 1 pin for direction, 1 pin for step, 1 pin for ground, 2 pins for plover, and 4 pins exiting from the driver that go to the Nema17 step motor, I had ~80 jumper wires on my protoboard and it was a mess! When I looked at it, the first thought that came to my mind was “if one of the jumper cables comes out it might burn out some driver or motor”, I didn’t want that. To avoid such a hazard, I bought a PCB protoboard and started soldering the elements on it. This cleaned the mess. Now I had a custom PCB board where everything is connected and works as it should.

Let’s give the users some feedback
After I had a working robot which handles ~200 rotations to solve the cube, the user (observer) doesn’t have any idea when it’s going to end. It’s only a simple 90 degrees rotations until you see the solved cube. I had a small display that I used to display a step-down counter, so the observer has an idea of how many steps are left until the cube is solved.
Utilize the robot
Solving the cube in ~200 steps is nice, but it’s not fast. The Beginners method is good for learning how to solve the cube, but it’s the slowest algorithm. Now I need something that will solve the cube much faster. After a little research on the internet, I found out about the F2L algorithm that can solve any cube in under 23 steps. That’s nice. The only thing I need is to implement that code in my application and use it. So, I did. I used Kociemba implementation http://kociemba.org/cube.htm. It works great, I just implemented it in C# and used it in my service. Now the cube is solved in 23–25 steps.
Lesson learned
I’ve spent almost one year on this project, this is the longest pet project that I have been working on. In the past, I’ve had many pet projects, from simple websites to various full stack websites and several mobile applications. I have tried out a lot of technologies and development stacks, but nothing keeps my attention like this one. Maybe because in this project for the first time in my carrier I tried all layers of the development, from hardware to software, from the basic wirings and voltage adjustments to API server call. If you reach this part of the blog, you already noted that I had more failures than successes during the development process, but the small achievements/milestones during the process are what keeps your desire alive. I never give up, but to be able to do that, whatever your goal is split it to several milestones, that way you will more quickly get some satisfaction from something you achieved and that is what gives you boost for the next small goal. Any pet project is time-consuming but do it in a way that you’ll have fun during the development, share some of your achievements with your family or colleagues, they will give you some feedback and encouragement for your next steps. I had a few improvement ideas from feedback that I received from my close ones. The easiest way to learn something new is when you have fun doing it.
If you have any question or suggestion please don’t hesitate to contact me, I’m willing to help you in any way that I’m capable of. If you want some peace of code from my project or any help, please let me know.
The website that I have developed that helps you to solve the Rubik’s cube can be found on the following link http://rubiks.kostoski.com/.
Lastly, if you found this post useful, please feel free to share + give it 👏️ so others can find it too!